Get started with a three node cluster installation
Control converged (AIO) cluster overview
The three-node cluster consists of three Control Converged Nodes, each integrating all core roles control plane services, compute, network, and storage into a single machine.
This three-node control-converged deployment provides high availability and clustering capabilities, making it suitable for testing, evaluation, or small-scale production environments.
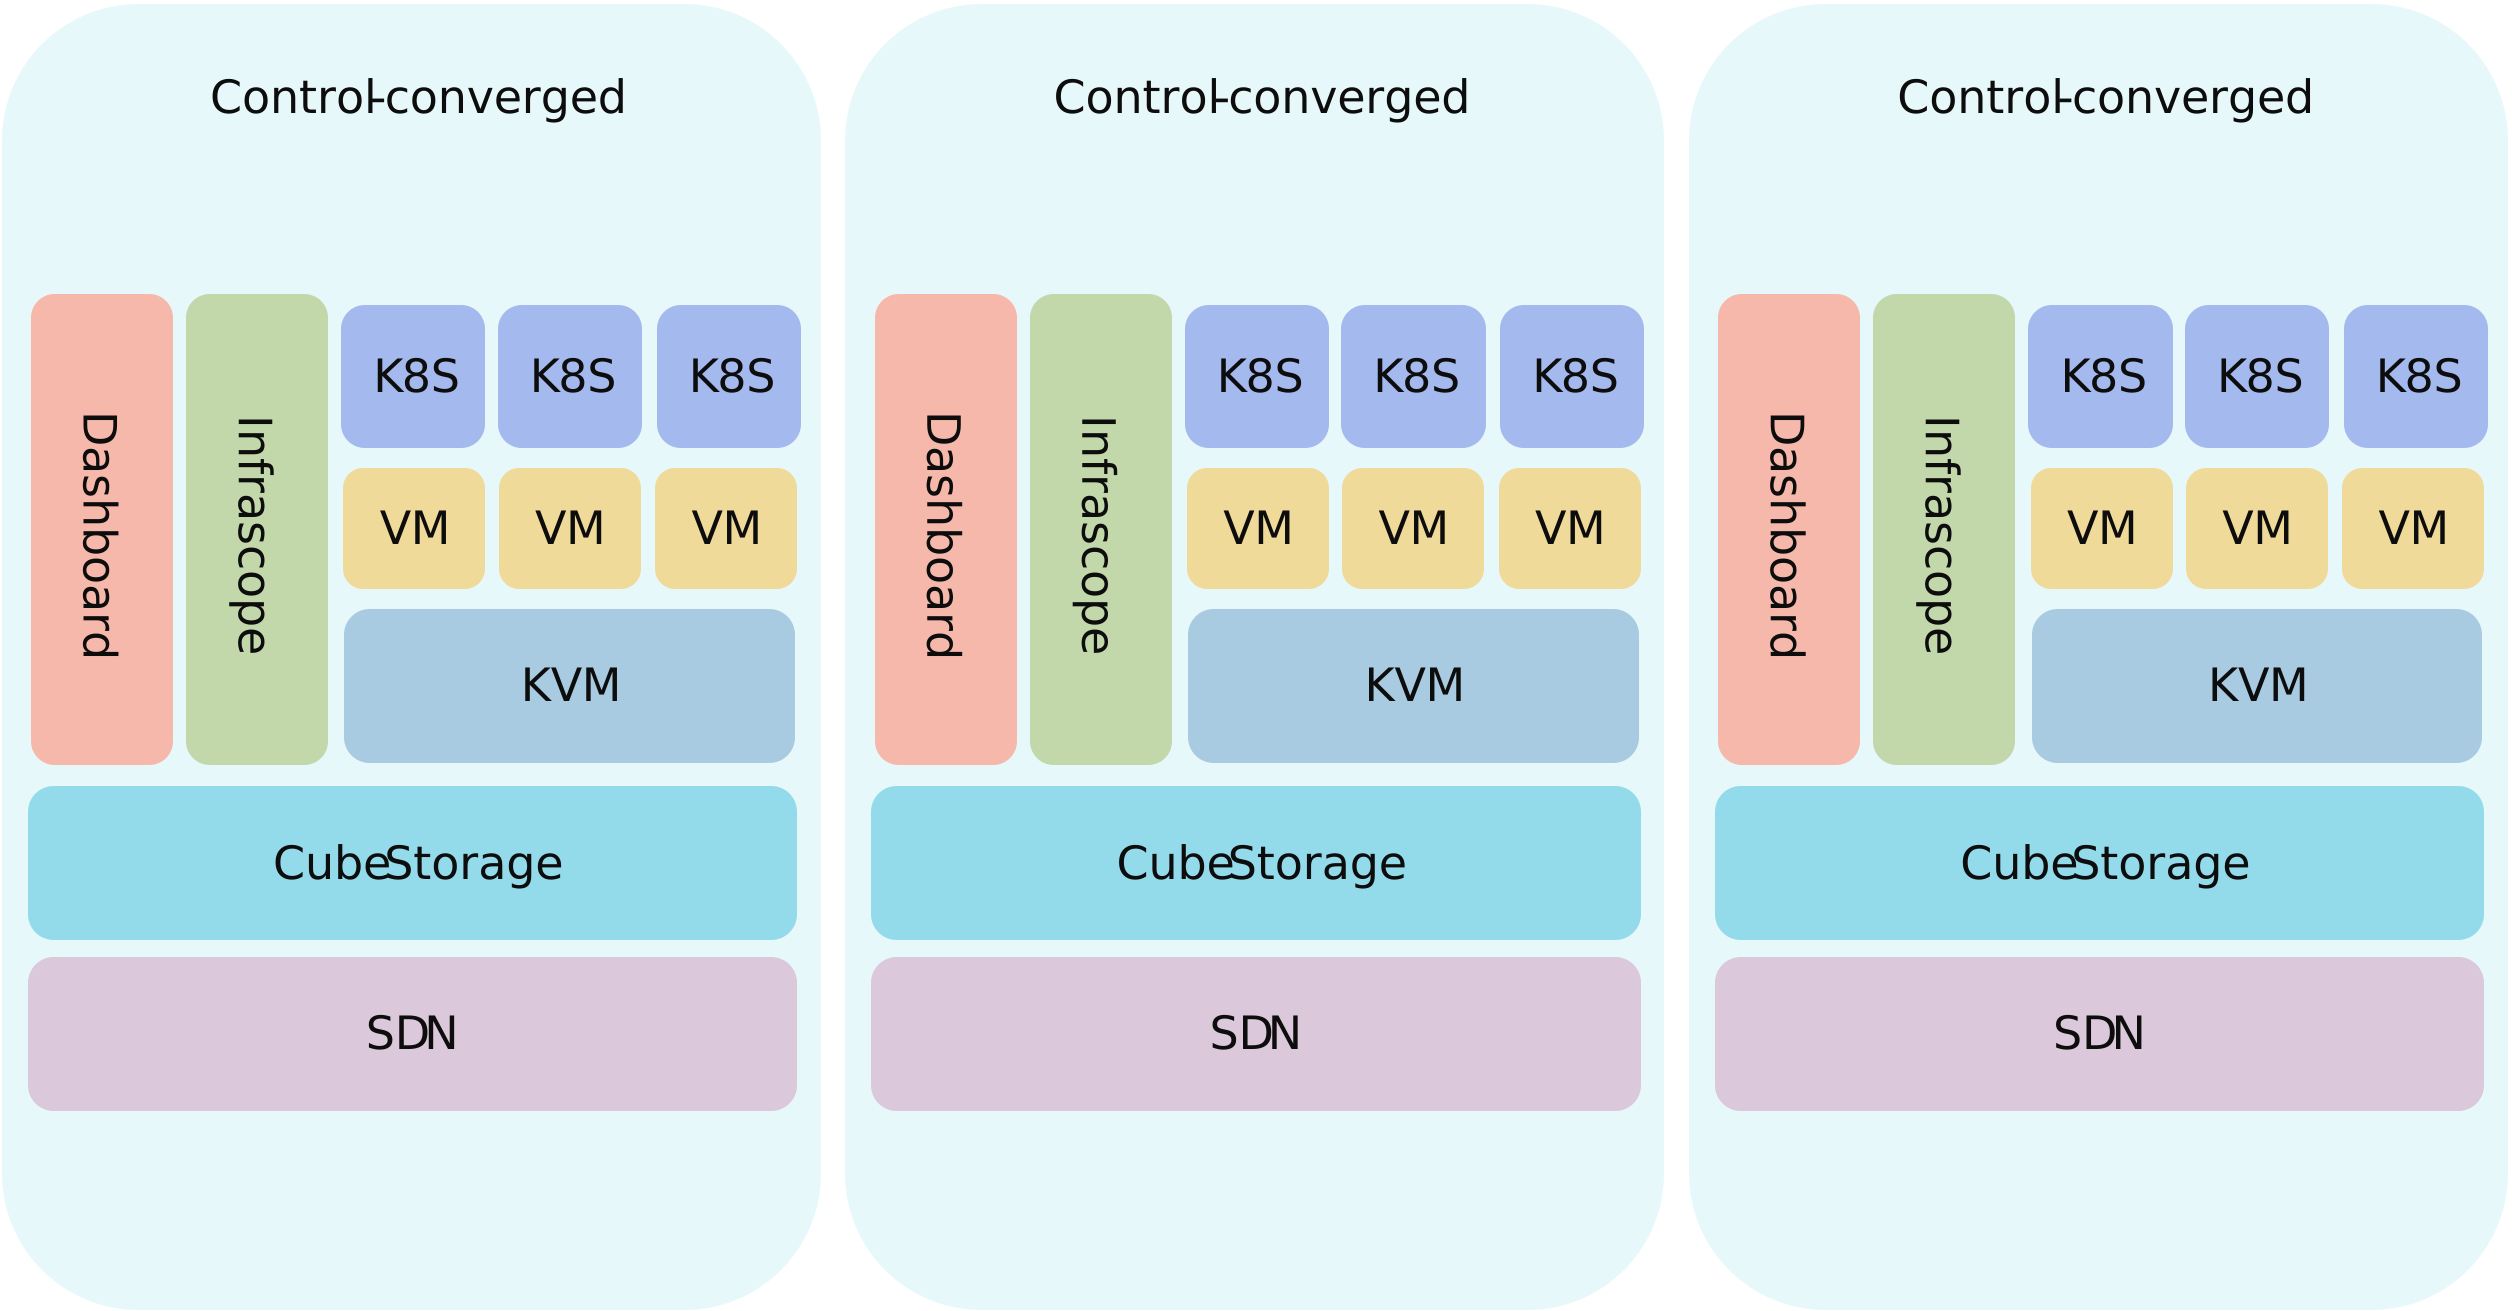
AIO cluster hardware requirements
Processor
- CubeCOS requires x86-64-v2 CPU with a minimum of 8 Cores and 16 Threads.
- The processors used must support and have hardware virtualization enabled (Intel VT-x or AMD-V).
- Must be 64-bit and released after 2017.
Memory
- CubeCOS requires a minimum of 128GB of RAM for cluster services.
- Reserve additional 1.7GB of RAM for each 1TB of usable software-defined-storage capacity.
System drive (Solid State Drive)
- Minimum: 1x 500GB Solid State Drive (SSD) for the system drive.
- Production: Configure RAID-1 with two SSDs for redundancy in all production environments.
Storage drives
- CubeCOS requires additional persistent storage such as SSD, HDD, or NVMe for the storage pool.
- CubeCOS supports the following storage configuration:
- JBOD (Just a Bunch Of Disks)
- HBA (Host Bus Adapter)
- Flash-based (SSD) storage medias are required for Kubernetes workloads.
Download the installation files
Download the installation files from the CubeCOS GitHub repository based on your preferred installation method.
Supported installation options
- UBS flash drive: Create a bootable USB to install CubeCOS directly.
- ISO image: Mount the ISO via virtual media or burn it to a DVD.
- Network Boot via PXE Server (IMG/ISO): Install over the network using a PXE server with an IMG or ISO format.
Prepare cluster information
Utilize the following tables to prepare information required for a cluster deployment.
CubeCOS node IP addresses and hostnames
| CubeCOS node | Hostname | IP Address |
|---|---|---|
| Node 1 | ||
| Node 2 | ||
| Node 3 | ||
| Cluster VIP |
| CubeCOS node | Hostname | IP Address |
|---|---|---|
| Node 1 | cc1 | 10.32.2.231 |
| Node 2 | cc2 | 10.32.2.232 |
| Node 3 | cc3 | 10.32.2.233 |
| Cluster VIP | ccvip | 10.32.2.230 |
Public network configuration
For the quickstart guide, use the following cluster information:
- Public network: Network that allows access to the internet or to internal resources.
- Flat network: Flat Networking uses Ethernet interfaces set up in bridge mode to enable seamless network traffic flow between all nodes. This configuration can be implemented using either a single network adapter on the physical host or multiple adapters, depending on the setup.
- DHCP IP Pool: The available DHCP IP pool is in the same flat network and from a range of 100 to 200.
Before proceeding, confirm that:
- The selected subnet doesn’t overlap with other networks in your environment.
- The gateway IP is reachable from within the subnet.
- The DHCP range is not in use by other services and has enough available IPs for your expected VM instances.
- The CIDR and gateway are correctly configured to allow external access if required (e.g., internet, upstream routers, etc.).
You’ll configure the public network during the cluster set_ready process.
Chanage the public network and DHCP IP range to what is applicable in your network.
| Public network CIDR | Public network gateway address | DHCP IP pool range |
|---|---|---|
| Public network CIDR | Public network gateway address | DHCP IP pool range |
|---|---|---|
| 10.32.0.0/16 | 10.32.0.254 | 10.32.2.100-10.32.2.200 |
Begin the installation process
After preparing the installation media and booting the target machine. Start the installation process.
Log in and start the restore process
Before you begin setup, verify the network settings:
- Ensure that the assigned IP address is within the correct subnet range.
- Confirm that the CIDR notation reflects the intended network mask (e.g., /24 for 255.255.255.0).
- Make sure there are no IP conflicts within the target network.
The restore operation erases all data on the selected disk.
Backup any important data before proceeding.
-
At the
uefi-installerlogin prompt, enter the following credentials.- Username:
admin - Password:
admin
- Username:
-
Run the following command to start the installation:
-
Select the target partition when prompted
-
Confirm by entering
YESrestore
Resolving theNo Images FounderrorIf the installer returns a
hex_install: Error: No images founderror, resolve the issue following Resolve theNo images founderror. -
-
After the installation completes, reboot the system with:
-
Confirm by entering
YESreboot
-

Getting started from the CubeCOS console
After completing the restore process and rebooting, you'll see the CubeCOS setup banner.
Press F2 to begin the setup process.

Login to begin installation
Use the default credentials to log in:
- Username: admin
- Password: admin
Choose a setup option - Wizard
Enter 1 to launch the interactive setup wizard.
    First Time Setup Options:
    1: Wizard
    2: Advanced
    Enter index: 1
x while navigating the wizardUse the n (next) and p (previous) keys to move between wizard screens. Pressing x exits the wizard and discards all staged configuration so far (hostname, VLAN, IP, role, HA, etc.), forcing you to start over. Only use x if you intend to abandon the setup process entirely.
Read and accept the EULA
Follow the prompts to read and accept the license terms.
    -- Welcome --
    Welcome to the Cube Appliance setup wizard.
    Using this setup wizard, you can:
    * View and accept the Software License Agreement
    * Set the appliance password
    * View and configure networking

    Press Enter to continue.

    -- Software License Agreement --
    Currently selected language: English
    1: Select language for license display
    2: Read Bigstack terms
    3: Read non-Bigstack terms
    4: Proceed to acceptance

    Select option: 4

    By choosing 'I agree,' you agree that (1) you have had the opportunity to
    review the terms of licenses presented above and (2) such terms govern this
    transaction. If you do not agree, choose 'I do not agree'.
    1: I agree
    2: I do not agree

    Select option: 1
Change the password
By default, CubeCOS updates the password after cluster set_ready. It uses the format [email protected], where xxx.xxx are the last two octets of the cluster's VIP IP.
If the cluster VIP is 192.168.100.100, the updated default password will be:
[email protected].
Select option 1 to change the password manually.
    -- Appliance Password --
    Password changes are applied immediately.
    Password has not been modified.
    1: Change password
    x: Exit
    p: Previous screen
    n: Next screen

    Select option: 1

    - Change Password -
    Enter old password: admin
    Enter new password:
    Confirm new password:
    Password successfully changed.
Configure hostname
The hostname must be in lowercase and cannot contain underscores (_), spaces, or special characters (!@#$%^&*())
A valid hostname must:
- Contain only lowercase letters (a-z), numbers (0-9), and hyphens (-)
- Be 64 characters or less in length
- Be unique within the network
- Must start with a letter
- Not be entirely numeric
Replace <your-host-name> with a unique hostname for your CubeCOS host.
    -- Host Name Configuration --
    Host name: unconfigured
    1: Change the host name
    x: Exit
    p: Previous screen
    n: Next screen

    Select option: 1

    - Change the Host Name -
    Enter the new host name: <your-host-name>

    -- Host Name Configuration --
    Host name: <your-host-name>
    1: Change the host name
    x: Exit
    p: Previous screen
    n: Next screen

    Select option: n
[Optional] Configure network bonding
Network bonding is optional and only required for deployments that require network redundancy. To better understand network configuration options and deployment scenarios, refer to the network configuration section.
Skip to Configure an IP address for a specific interface if bonding and VLAN are not required.
If a network cable is connected, the [Speed] column will display the link status (e.g., 1000Mb/s, 10Gb/s).
If no cable is detected, it will show N/A.
Do not use system reserved names such as bond0, bond1, bondx, or bd0 as bonding interface names.
    -- Network Bonding Settings --
    ---------------------------------------------------
       Label   BusID/Slaves     Driver  State    Speed
    ---------------------------------------------------
        IF.1   0000:04:00.0      r8169     UP    1000F
    ---------------------------------------------------
    1: Display policy
    2: Configure network bonding
    x: Exit
    p: Previous screen
    n: Next screen

    Select option: n
[Optional] Configure VLAN
Skip to Configure an IP address for a specific interface if VLAN is not required.
    -- VLAN Settings --
    ---------------------------------------------------
       Label   BusID/Slaves     Driver  State    Speed
    ---------------------------------------------------
        IF.1   0000:04:00.0      r8169     UP    1000F
    ---------------------------------------------------
    1: Display policy
    2: Configure vlan network
    x: Exit
    p: Previous screen
    n: Next screen

    Select option: n
To create a VLAN sub-interface, choose 2: Configure VLAN network instead of skipping a tagged overlay or storage network carried on a 10G uplink. Then select Create, choose the parent interface and enter the VLAN ID.
    2: Configure vlan network
    1: Create
    Select interface: IF.5
    Enter VLAN ID: 80
Repeat Create for each VLAN. The new sub-interfaces then appear as additional labels (for example IF.5.80, IF.5.95) in the next step, where you assign each one an IP address.
Configure an IP address for a specific interface
Assign a static IPv4 address, subnet mask, and default gateway to the primary interface. This guide assumes a single network interface labelled IF.1.
Before proceeding, make sure you have the following information:
- The static IP address for the CubeCOS management VIP
- The subnet mask of the management network
- The default gateway for the subnet
- The IP addresses of DNS servers to be used
    -- Networking Settings --
    ---------------------------------------------------
       Label   BusID/Slaves     Driver  State    Speed
    ---------------------------------------------------
        IF.1   0000:04:00.0      r8169     UP    1000F
    ---------------------------------------------------
    1: Display device status
    2: Display policy
    3: Configure IF.1
    x: Exit
    p: Previous screen
    n: Next screen

    Select option: 3

    - Configure IF.1 -
    Enter the IPv4 address: <your-cluster-ip-address>
    Enter the IPv4 subnet mask: <your-subnet-mask>
    Enter the IPv4 default gateway: <your-gateway-address>

    -- Networking Settings --
    ---------------------------------------------------
    Label   BusID/Slaves     Driver  State    Speed
    ---------------------------------------------------
        IF.1   0000:04:00.0      r8169     UP    1000F
    ---------------------------------------------------
    1: Display device status
    2: Display policy
    3: Configure IF.1
    x: Exit
    p: Previous screen
    n: Next screen

    Select option: n
The example above is the primary interface, which goes straight to IPv4 address → subnet mask → gateway. A VLAN sub-interface (for example IF.5.80) instead prompts:
Enable this interface?→ answerYesMake this the default interface?→ answerNo(only the management interface should be the default)- IPv4 address → subnet mask
Do not configure a gateway on a non-default interface. Leave the default route as the management interface. Only the management interface (IF.1) is assigned a gateway.
Configure DNS servers
Enter the DNS servers that CubeCOS should use, this can be internal or external DNS resolves. Set up to three DNS servers to use. The following example has been provided for setting an external DNS server at 1.1.1.1.
    -- DNS Configuration --
    No DNS servers configured.
    1: Set DNS server 1
    2: Set DNS server 2
    3: Set DNS server 3
    x: Exit
    p: Previous screen
    n: Next screen

    Select option: 1

    - Set DNS Server 1 -
    Enter the DNS server IP address: <your-dns-server>
Configure time zone
Set the same timezone on all nodes in the cluster. Consistent timekeeping is critical for coordinating services, ensuring accurate log timestamps, and avoiding synchronization issues.
To configure the time zone, select option 1.
    -- Time Configuration --
    Time configuration changes are applied immediately.
    Time Zone: America/New_York
    Date: 05/29/2025
    Time: 14:00:37
    1: Change the time zone
    2: Change the date
    3: Change the time
    x: Exit
    p: Previous screen
    n: Next screen

    Select option: 1
Configure CubeCOS node role
Select the control-converged role in a three-node cluster deployment. This role combines control plane, compute, and storage functions on a single host.
    -- Cube Role --
    Current role: undef
    Current Management: IF.1
    Current Domain/Region: default/RegionOne
    Current Cube Secret Seed: N/A
    1: Change role
    x: Exit
    p: Previous screen
    n: Next screen

    Select option: 1
When prompted, enter the following values:
The cluster secret seed serves as an input variable for cryptographic value generation. Set a unique and strong value to ensure secure cluster communications and cryptographic operations.
    - Change Role -
    Select a role:
    1: control
    2: compute
    3: storage
    4: control-converged
    5: edge-core
    6: moderator
    Enter index: 4                                          # Select control-converged role
    Specify external IP/domain [optional]:                  # Leave blank
    Specify management interface: IF.1                      # Interface for control/API traffic
    Specify provider interface: IF.1                        # Interface for VM data and external bridge
    Specify overlay interface: IF.1                         # Interface used for internal SDN tunnel traffic
    Specify storage interface [frontend(,backend)]: IF.1    # Interface for Ceph traffic
    Specify region ("RegionOne"):                           # Keep default or customize as needed
    Specify cluster secret seed: <replace-with-your-secret> # Unique secret shared among nodes in the same cluster
    Specify management CIDR ("10.254.0.0/16"):              # (Optional) Change only if there is a subnet conflict, must be /16 subnet
Configure High Availability
Enable high availability on a three node cluster to provide fault tolerance features.
Select Change HA by selecting option 1. Then answer Yes to enabling high availability Cube.
    -- Cube High Availability --
        Current HA setting: disabled
        1: Change HA
        x: Exit
        p: Previous screen
        n: Next screen

        Select option: 1

        - Change HA -
        High Available Cube:
        1: Yes
        2: No
        Enter index: 1
Enter the hostname and IP address from Plan CubeCOS node IP addresses and hostnames. Select option n to proceed.
        Specify control virtual Hostname: <cluster-virtual-hostname>
        Specify control virtual IP: <cluster-virtual-ip>
        Specify control group hostname [HOST,HOST,...]: <control-node-hostname-1>,<control-node-hostname-2>,<control-node-hostname-3>
        Specify control group address [IP,IP,...]: <control-node-ip-1>, <control-node-ip-2>, <control-node-ip-3>

        -- Cube High Availability --
        Current HA setting: enabled
        Current Control Virtual Hostname: ccvip                                   # sample output
        Current Control Virtual IP: 10.32.2.230                                   # Sample output
        Current Control Group: cc1(10.32.2.231),cc2(10.32.2.232),cc3(10.32.2.233) # example output
        1: Change HA
        x: Exit
        p: Previous screen
        n: Next screen

        Select option: n
The hostname and address lists in the control group must contain the same number of entries, corresponding one-to-one. If the counts differ, for example due to a trailing comma or an extra space at the address prompt, the wizard reports Hostname and IP address number mismatch and discards the entire HA configuration, so you must re-enter it.
Type both comma-separated lists in full and submit them; do not press 'Enter' on an empty value.
Beginning policy application and cluster initialization
In a three-node CubeCOS deployment, the first node initialized acts as the cluster master. This node is responsible for applying the base configuration and initializing core services such as identity, networking, storage, and scheduling.
Do not proceed with initializing the remaining control nodes until the first (master) node has fully completed policy application.
Starting other nodes before the master node finishes may result in:
- Service registration failures
- Configuration drift
- Cluster instability or inconsistent state
After the master node completes its setup and displays a successful policy application message, you can safely accept the configuration on the remaining two control-converged nodes.
The following is an example of a complete configuration used during deployment.
    Summary
    Password has not been modified.
    Host name: control-converged
    IF.1
        Default interface.
        IPv4 Mode: Manual
        IPv4 Address: 10.32.2.231
        IPv4 Netmask: 255.255.0.0
        IPv4 Gateway: 10.32.0.254
        IPv6 Mode: Automatic
    DNS server 1: 1.1.1.1
    Time Zone: Asia/Taipei
    Date: 05/29/2025
    Time: 14:54:19
    Role: control-converged
    External IP/Domain: N/A
    Management: IF.1
    Provider: IF.1
    Overlay: IF.1
    Storage: IF.1
    Domain/Region: default/RegionOne
    Cube Secret Seed: bigstack
    Management CIDR: 10.254.0.0/16
    High Availability: enabled
    Control Virtual Hostname: ccvip
    Control Virtual IP: 10.32.2.230
    Control Group: cc1(10.32.2.231),cc2(10.32.2.232),cc3(10.32.2.233)
    High Availability: disabled
    1: Accept the configuration
    2: Cancel the configuration
    3: Modify the configuration

    Select option: 1
The time required to apply the configuration may vary depending on system hardware performance.
Monitor the console output. When the process completes successfully, you’ll see a confirmation message.
Policy changes were successfully applied.
Repeat the installation process for all three nodes in the cluster.
Error message
If the configuration contains errors, the installation process will fail and display an error message.
    Policy changes could not be applied. System must be rebooted.
    Press enter to continue:
Allow the node to reboot before retrying.
After the reboot, review your configuration settings carefully and make any necessary corrections before attempting the installation again.
Initialize the cluster after successful policy application
After the initial configuration is applied successfully, complete the setup by initializing the CubeCOS cluster.
Log into the cluster
From your management workstation or terminal, connect to the CubeCOS node using SSH:
ssh admin@<your-cluster-ip-address>
Use the following credentials:
- Username:
admin - Password:
- The system-generated default (
Cube@<last-two-octets-of-VIP>) - Or the custom password you configured during setup
- The system-generated default (
This command only needs to be executed once on one of the control role nodes, which can be one of the following:
- control
- control-converged
- edge-core
- moderator
Cluster initialization
Instruct the cluster to initialize the system accordingly by running the cluster set_ready CLI command.
This command prepares the cluster for operation by:
- Verifying and activating storage devices.
- Applying storage replication policies.
- Initializing core platform services (compute, networking, storage, identity, monitoring, etc.)
- Prompting for external network setup
Run cluster set_ready only once, on one control-role node. Running it multiple times or from different nodes can lead to configuration conflicts or service instability.
Start the initialization process by running the following command:
cluster set_ready
Verify the disk status and layout is correct in the following output. Every physical storage device is divided into two OSDs. WIth the SSD storage being able to host all the latency sensitive workload or used in a hybrid mode to increase performance.
    Welcome to the Cube Appliance
    Enter "help" for a list of available commands
    controller> cluster set_ready
    Storage disk configurations.
    ============================================================
    GROUP: default
    ID  CLASS  WEIGHT   TYPE NAME       STATUS  REWEIGHT  PRI-AFF
    -1         1.63660  root default
    -3         1.63660      host cube1
    0    hdd  0.81830          osd.0       up   1.00000  1.00000
    1    hdd  0.81830          osd.1       up   1.00000  1.00000
    Create a shared external network?
    Enter 'YES' to confirm: YES
At the prompt:
Create a shared external network, pressEnter- Enter
YESto confirm
No.The Create a shared external network? prompt creates a flat (untagged) external network. If your external network is VLAN-tagged, answer NO here and create it afterward from the Skyline web UI instead, following the Create an external/internet network with VLAN guide. A flat external network can likewise be created from the UI with the Create an external/internet network with flat networking guide.
Enter the network configuration details prepared in Plan public network configuration
    Input public network in CIDR: 10.32.0.0/16
    Input gateway of public network: 10.32.0.254
    Enter public network available IP list [IP,IP-IP]: 10.32.2.100-10.32.2.200
    [1/7] Updating storage replication rule
    [2/7] Checking SDN services
    [3/7] Configuring modules
    (1/5) processing: cube_last
    (2/5) processing: octavia
    (3/5) processing: influxdb
    (4/5) processing: opensearch-dashboards
    (5/5) processing: kafka
    [4/7] Starting cluster
    [5/7] Strengthening password
    [6/7] Cluster check and repair
            Service  Status  Report
        ClusterLink      ok  [ link(v) clock(v) dns(v) ]
        ClusterSys       ok  [ bootstrap(v) license(v) ]
        ... # Output abbreviated
        Notifications    ok  [ influxdb(v) kapacitor(v) ]
    [7/7] Global Information Tracker
    Done
Once all services report ok, and done is displayed in the console, the cluster is ready.
set_ready runs a background check-and-repair, but it does not always heal every service on the first pass. After it finishes, run a cluster health check and repair any group that is not ok:
cluster check
If a group reports NG, repair it (for example with cluster health <Group> or the relevant per-service repair) and re-run cluster check until every group reports ok.
Access the management interface
- Open a browser on your local system.
- Navigate to
https://<your-cluster-ip-address> - Login with the credentials
- Username:
admin - Password: The default or the password set during setup
- Username:
- Once logged in, you can manage your CubeCOS environment through the web UI.
Launching your first instance
To provision your first virtual machine in CubeCOS, follow the Launch Your First Instance guide.
Troubleshooting
Resolve erroneous configuration.
If there are errors in the configuration, the installation process will fail and display an error message.
Allow the node to reboot before retrying. After rebooting, carefully review your configuration settings and make any necessary corrections before attempting the installation again.
    Policy changes could not be applied. System must be rebooted.
    Press enter to continue:
Resolve the No images found error
If the restore command returns the following error, the installer cannot locate the installation media:
uefi-installer> restore
hex_install: Error: No images found
Unexpected error
uefi-installer>
To resolve this, manually mount the installation media by completing the following steps.
Exit the installer CLI and open a root shell
Exit the installer CLI and log in as root:
uefi-installer> exit
At the login prompt, enter the following credentials:
- Username:
root - Password:
admin
uefi-installer login: root
Password:
Last login: Mon Jul 11 06:49:03 on ttyS0
Welcome to the Cube Appliance Installer
#
Verify block devices with lsblk
Run lsblk to identify block devices and verify whether the installation media is mounted:
# lsblk

If the installation USB drive (for example, sdd1) has no listed mount point, proceed to the next step.
Mount the installation media manually
-
Mount the installation partition to
/mnt/install.mount /dev/sdd1 /mnt/install -
Verify the mount results.
# lsblkNAME MAJ:MIN RM SIZE RO TYPE MOUNTPOINTsda 8:0 0 744.6G 0 disk├─sda1 8:1 0 1000M 0 part├─sda2 8:2 0 2G 0 part├─sda5 8:5 0 357.4G 0 part├─sda6 8:6 0 357.4G 0 part└─sda7 8:7 0 26.9G 0 partsdb 8:16 0 5.1T 0 disk├─sdb1 8:17 0 400M 0 part├─sdb2 8:18 0 400M 0 part├─sdb3 8:19 0 2.6T 0 part└─sdb4 8:20 0 2.6T 0 partsdc 8:32 0 5.1T 0 disk├─sdc1 8:33 0 400M 0 part├─sdc2 8:34 0 400M 0 part├─sdc3 8:35 0 2.6T 0 part└─sdc4 8:36 0 2.6T 0 partsdd 8:48 1 28.7G 0 disk└─sdd1 8:49 1 5.7G 0 part /mnt/installsr0 11:0 1 1024M 0 romsr1 11:1 1 1024M 0 romConfirm that
sdd1now shows/mnt/installas its mount point.
Return to the installer CLI and resume installation
Switch back to the admin user to resume the installation:
# su admin
Welcome to the Cube Appliance Installer
Welcome to the Cube Appliance
Enter "help" for a list of available commands
uefi-installer>
Return to Begin the installation process and continue.