CubeCOS Installation
CubeCOS installation consists of the following process.
- Image restore (Installation): Restoring (installing) CubeCOS onto the target device of the endpoint.
- Role configuration: Configure nodes with roles for your cluster setup, set network information, and high availablility if required.
- Cluster setup: The cluster can be
set_readyafter installation and node role configuration, initializing the SDS and completing cluster service of setup for CubeCOS.
Pre-Requisites
Please verify both hardware and network requirements have been met before proceeding with the installation.
Downloading the installation files
Navigate to the CubeCOS GitHub repository to download the installation files corresponding to your chosen installation method.
CubeCOS supports and provides installation medias for following installation methods:
- Image via USB Flash Drive: Boot and install directly from a USB device.
- ISO for Virtual Media or DVD: Mount the ISO using virtual media or burn it to a physical DVD for installation.
- Network Boot via PXE Server (IMG/ISO): Deploy over the network using a PXE server with either image or ISO format.
CubeCOS image restore (installation)
Once you have prepared your chosen installation media and booted the target machine from it, proceed to start the installation process.
Login and restore to setup CubeCOS
Before starting the setup, verify the IP address and IP CIDR configuration. Ensure that:
- The assigned IP address is within the correct subnet range.
- The CIDR notation accurately reflects the intended network mask (e.g., /24 for 255.255.255.0).
- There are no IP conflicts within the target network.
Performing a restore on the selected disk will erase all existing data on that disk.
Ensure that you have backed up any important data before proceeding with the installation.
- At the login screen, you will see the
uefi-installerprompt. Log in using the default credentials provided for the installation process.
- Default account/password: admin/admin
-
Begin by typing
restoreand selecting the partition where you want to install. Once selected, enterYESto proceed. -
Once completed, type
rebootand confirm by enteringYESto reboot the system.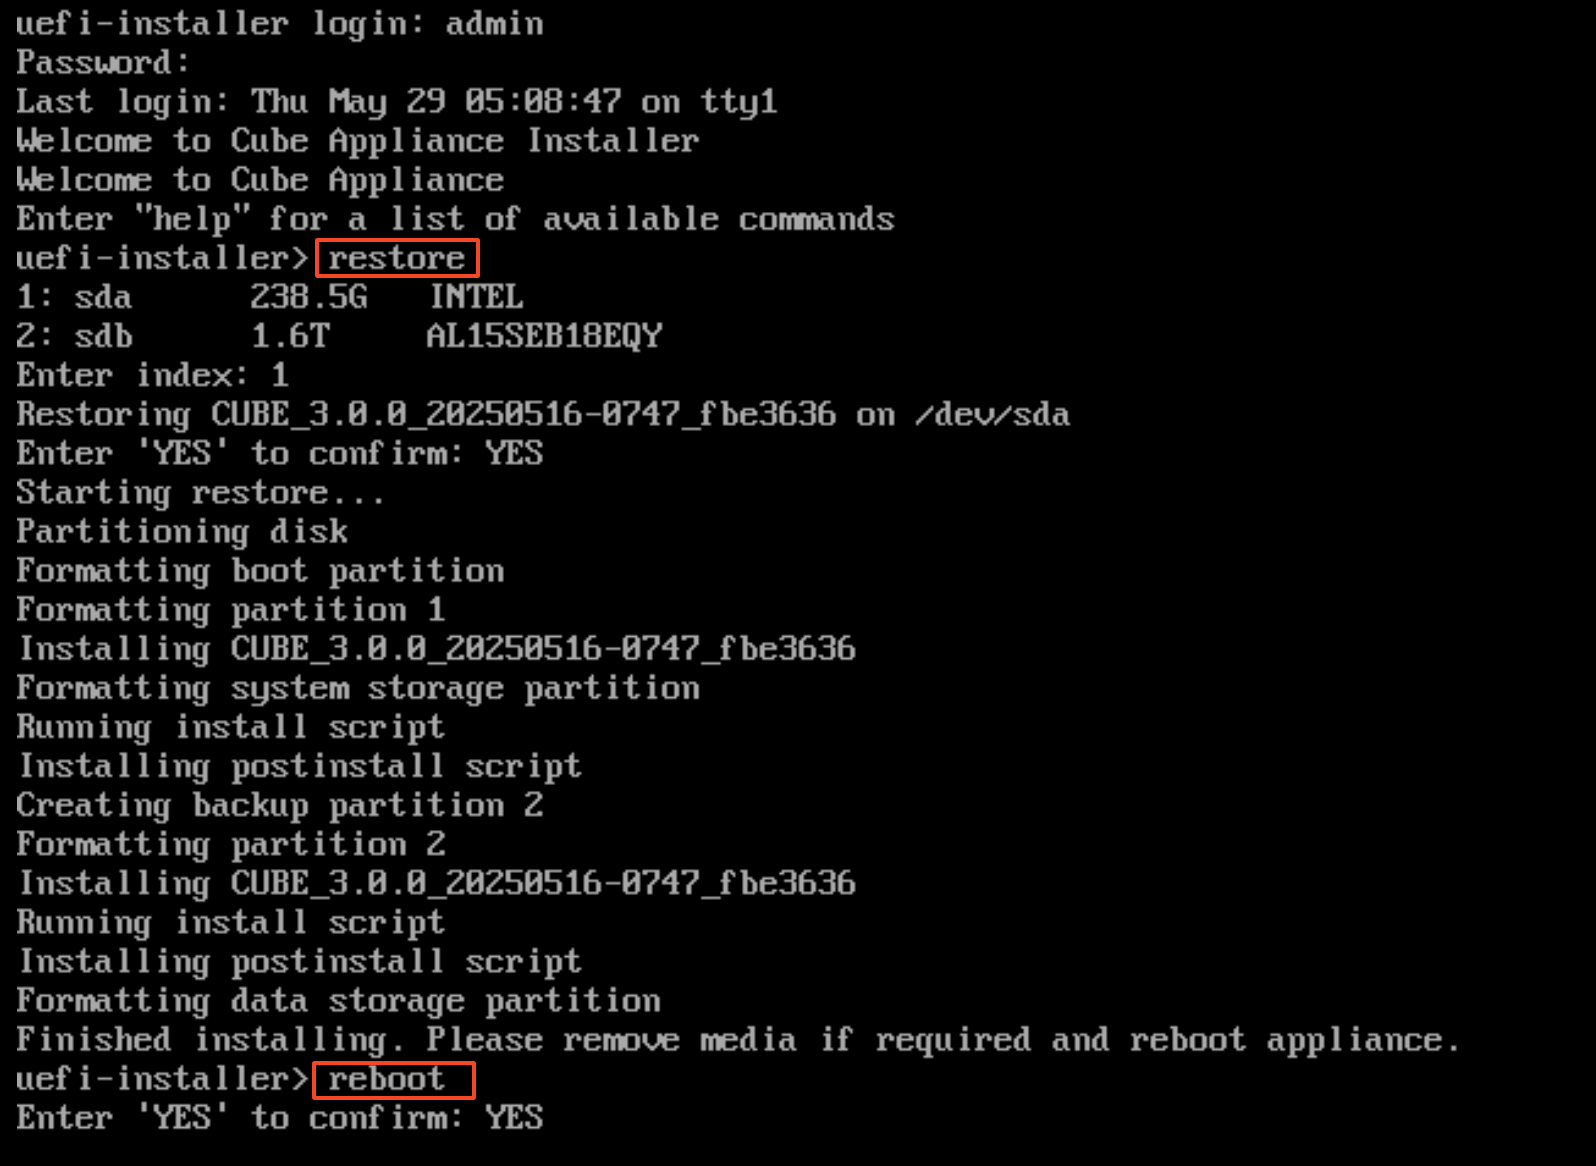
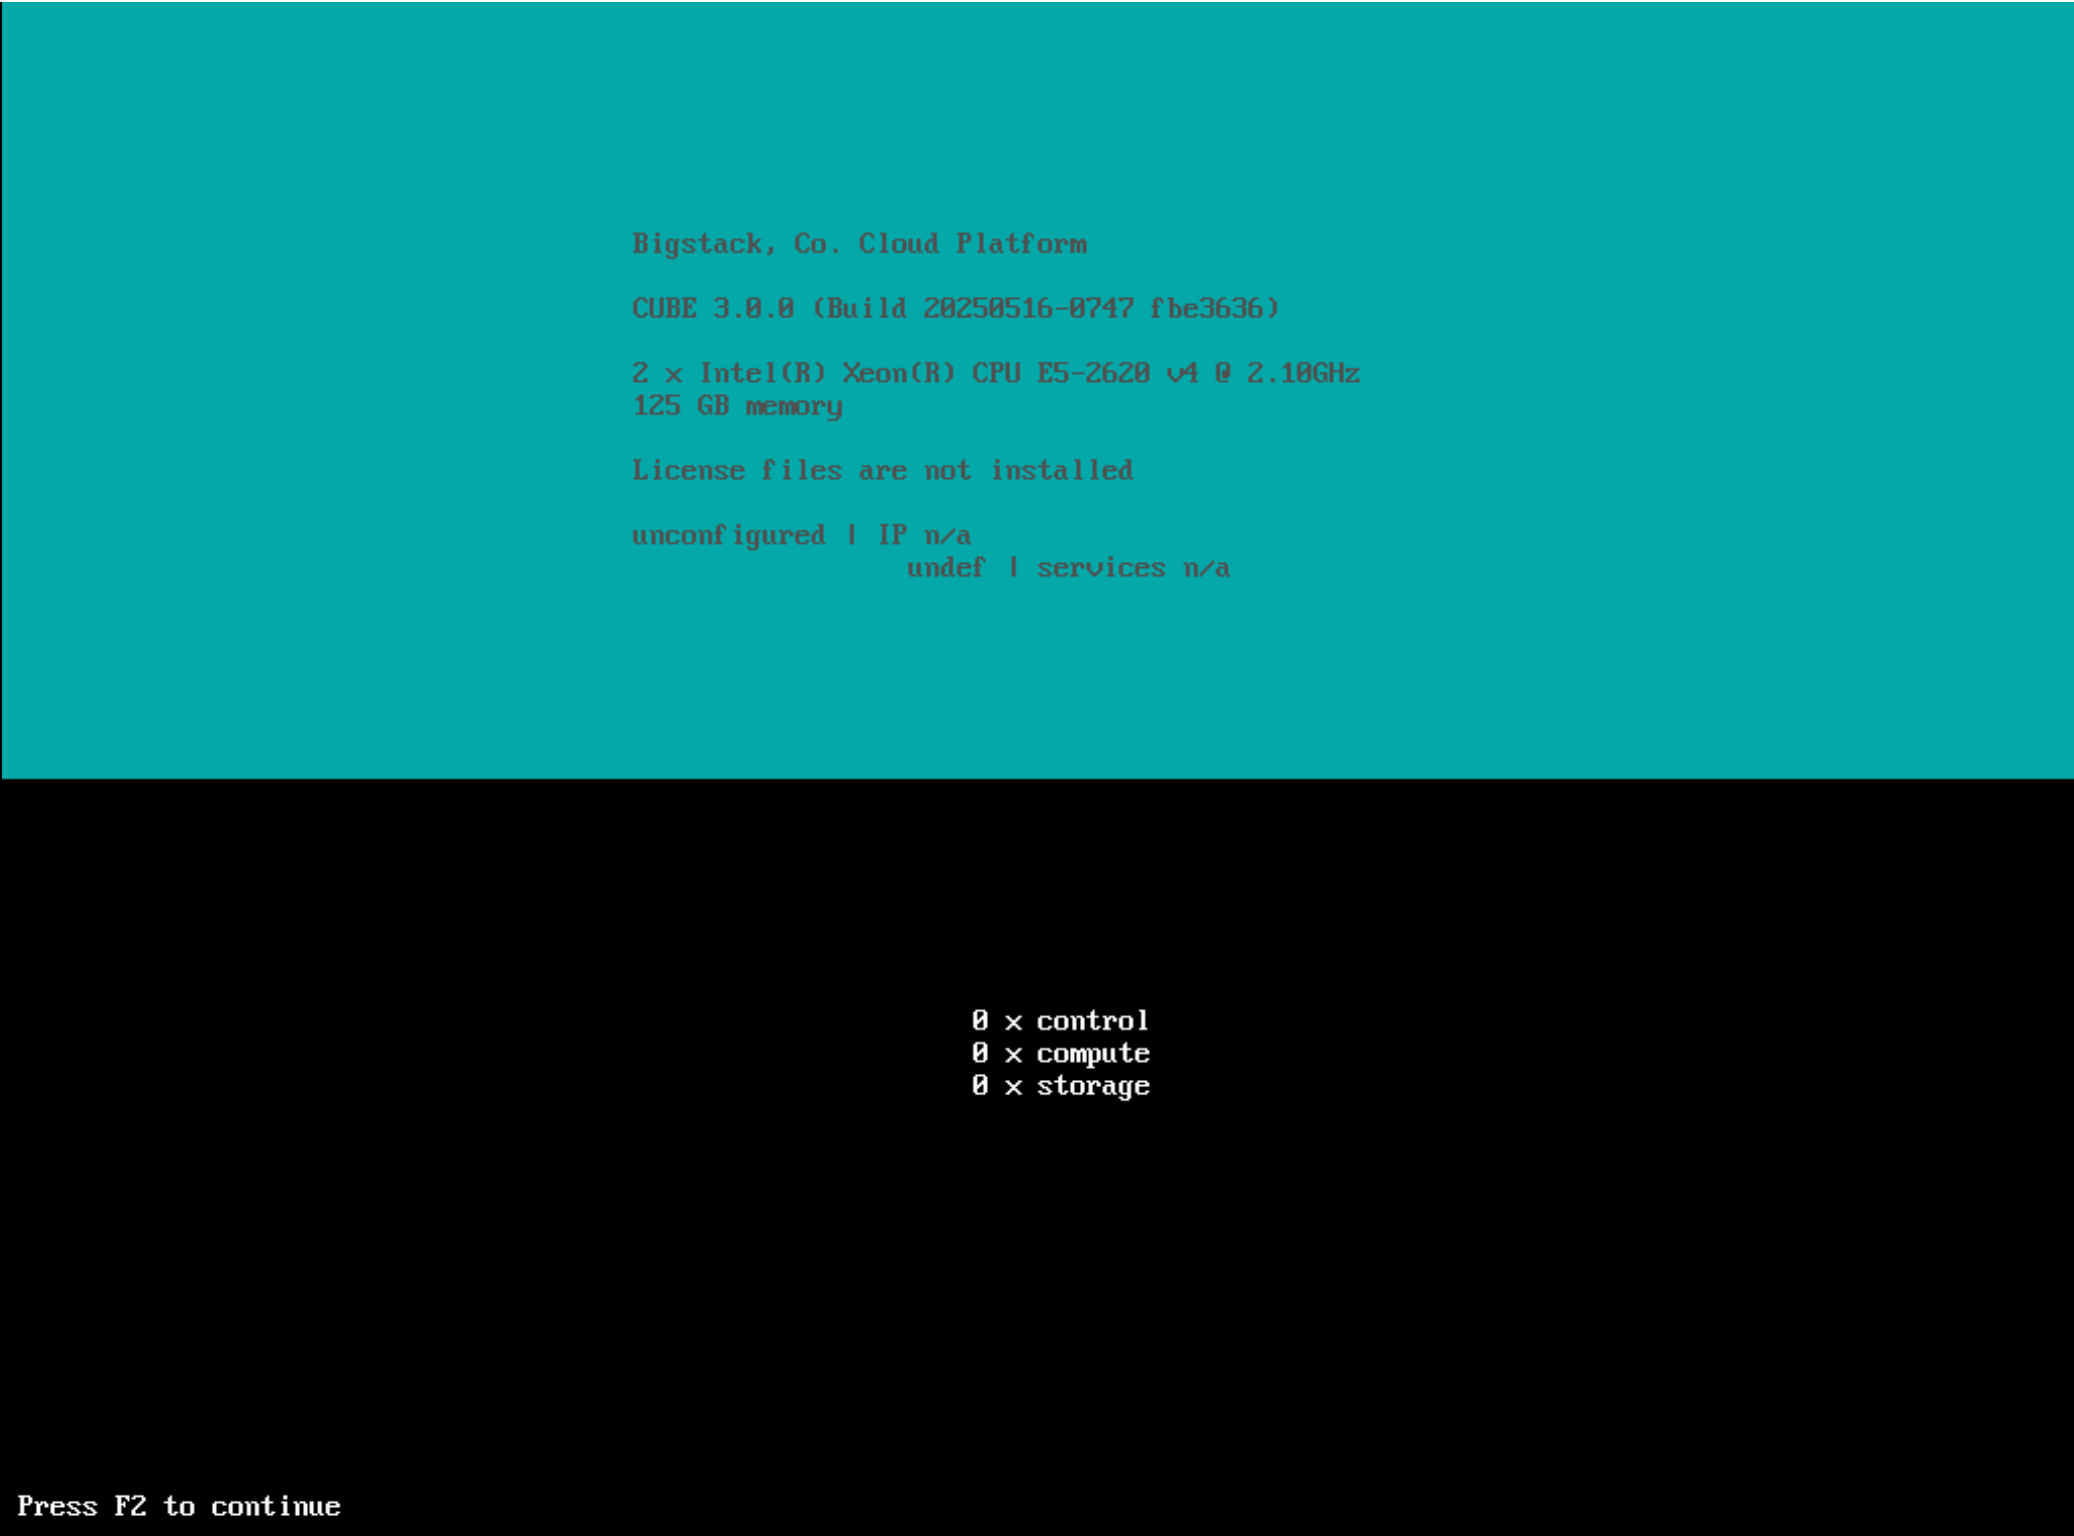
CubeCOS console banner
Press F2 to begin the setup process.
Choose a setup options - Wizard
Enter 1 to launch the setup wizard.
    First Time Setup Options:
    1: Wizard
    2: Advanced
    Enter index: 1
EULA
    -- Welcome --
    Welcome to the Cube Appliance setup wizard.
    Using this setup wizard, you can:
    * View and accept the Software License Agreement
    * Set the appliance password
    * View and configure networking

    Press Enter to continue.

    -- Software License Agreement --
    Currently selected language: English
    1: Select language for license display
    2: Read Bigstack terms
    3: Read non-Bigstack terms
    4: Proceed to acceptance

    Select option: 4

    By choosing 'I agree,' you agree that (1) you have had the opportunity to
    review the terms of licenses presented above and (2) such terms govern this
    transaction. If you do not agree, choose 'I do not agree'.
    1: I agree
    2: I do not agree

    Select option: 1
[Optional]Change the password
The default password admin is automatically updated after the cluster completes the set_ready operation.
The new password follows the pattern: [email protected], where xxx.xxx corresponds to the last two octets of the cluster’s VIP IPv4 address.
If the cluster VIP is 192.168.100.100, the updated default password will be:
[email protected].
    -- Appliance Password --
    Password changes are applied immediately.
    Password has not been modified.
    1: Change password
    x: Exit
    p: Previous screen
    n: Next screen

    Select option: 1

    - Change Password -
    Enter old password: admin
    Enter new password:
    Confirm new password:
    Password successfully changed.
Configure hostname
The host name must be in lowercase.
A valid hostname must:
- Contain only letters (a-z), numbers (0-9), and hyphens (-)
- Be 64 characters or less in length
- Be unique within the network
- Start with only letters, not a hyphen or numbers
- Not be entirely numeric
A valid hostname cannot contain:
- Special characters (!@#$%^&*())
- Underscores (_)
- Spaces
    -- Host Name Configuration --
    Host name: unconfigured
    1: Change the host name
    x: Exit
    p: Previous screen
    n: Next screen

    Select option: 1

    - Change the Host Name -
    Enter the new host name: control-converged

    -- Host Name Configuration --
    Host name: control-converged
    1: Change the host name
    x: Exit
    p: Previous screen
    n: Next screen

    Select option: n
[Optional] Configure network bonding
Network bonding is optional and only required for deployments that require network redundancy. To better understand network configuration options and deployment scenarios, refer to the network configuration section.
Skip to Configure IP address - IF.1 if bonding and VLAN are not required.
If a network cable is connected, the [Speed] column will display the link status (e.g., 1000Mb/s, 10Gb/s). If no cable is detected, it will show N/A.
Do not use bond0, bond1, bondx, or bd0 as bonding interface names. These names are reserved or may conflict with system defaults.
    -- Network Bonding Settings --
    ---------------------------------------------------
       Label   BusID/Slaves     Driver  State    Speed
    ---------------------------------------------------
        IF.1   0000:04:00.0      r8169     UP    1000F
    ---------------------------------------------------
    1: Display policy
    2: Configure network bonding
    x: Exit
    p: Previous screen
    n: Next screen

    Select option: n
[Optional] Configure VLAN
    -- VLAN Settings --
    ---------------------------------------------------
       Label   BusID/Slaves     Driver  State    Speed
    ---------------------------------------------------
        IF.1   0000:04:00.0      r8169     UP    1000F
    ---------------------------------------------------
    1: Display policy
    2: Configure vlan network
    x: Exit
    p: Previous screen
    n: Next screen

    Select option: n
Configure IP address - IF.1
    -- Networking Settings --
    ---------------------------------------------------
       Label   BusID/Slaves     Driver  State    Speed
    ---------------------------------------------------
        IF.1   0000:04:00.0      r8169     UP    1000F
    ---------------------------------------------------
    1: Display device status
    2: Display policy
    3: Configure IF.1
    x: Exit
    p: Previous screen
    n: Next screen

    Select option: 3


    - Configure IF.1 -
    Enter the IPv4 address: 10.32.2.230
    Enter the IPv4 subnet mask: 255.255.0.0
    Enter the IPv4 default gateway: 10.32.0.254


    -- Networking Settings --
    ---------------------------------------------------
    Label   BusID/Slaves     Driver  State    Speed
    ---------------------------------------------------
        IF.1   0000:04:00.0      r8169     UP    1000F
    ---------------------------------------------------
    1: Display device status
    2: Display policy
    3: Configure IF.1
    x: Exit
    p: Previous screen
    n: Next screen

    Select option: n
DNS setting
    -- DNS Configuration --
    No DNS servers configured.
    1: Set DNS server 1
    2: Set DNS server 2
    3: Set DNS server 3
    x: Exit
    p: Previous screen
    n: Next screen

    Select option: 1

    - Set DNS Server 1 -
    Enter the DNS server IP address: 1.1.1.1
Timezone configuration
Set the same timezone on all nodes within the cluster to ensure consistent timekeeping. This is critical for proper coordination of services and log synchronization across the cluster.
    -- Time Configuration --
    Time configuration changes are applied immediately.
    Time Zone: America/New_York
    Date: 05/29/2025
    Time: 14:00:37
    1: Change the time zone
    2: Change the date
    3: Change the time
    x: Exit
    p: Previous screen
    n: Next screen

    Select option: 1

    - Change the Time Zone -
    Select a continent or ocean:
    1: Africa
    2: Americas
    3: Asia
    4: Atlantic Ocean
    5: Australia
    6: Europe
    7: Pacific Ocean
    8: Etc
    Enter index: 3


    Select a timezone:
    1: (UTC+02:00) Asia/Jerusalem
    2: (UTC+03:00) Asia/Kuwait
    3: (UTC+03:00) Asia/Riyadh
    ~~~~~~
    30: (UTC+08:00) Asia/Taipei
    ~~~~~~
    39: (UTC+12:00) Asia/Kamchatka
    Enter index: 30
Configure Role
To learn about CubeCOS architecture and node roles, refer to the Architecture section or the Roles section.
    -- Cube Role --
    Current role: undef
    Current Management: IF.1
    Current Domain/Region: default/RegionOne
    Current Cube Secret Seed: N/A
    1: Change role
    x: Exit
    p: Previous screen
    n: Next screen

    Select option: 1

    - Change Role -
    Select a role:
    1: control
    2: compute
    3: storage
    4: control-converged
    5: edge-core
    6: moderator
    Enter index: 4
    Specify external IP/domain [optional]:
    Specify management interface: IF.1
    Specify provider interface: IF.1
    Specify overlay interface: IF.1
    Specify storage interface [frontend(,backend)]: IF.1
    Specify region ("RegionOne"):
    Specify cluster secret seed: bigstack
    Specify management CIDR ("10.254.0.0/16"):
Configure High Availability
High availability (HA) is not supported for single-node deployments
For single node deployment without HA, press n to skip the configuration.
    -- Cube High Availability --
    Current HA setting: disabled
    1: Change HA
    x: Exit
    p: Previous screen
    n: Next screen
Beginning policy application and cluster initialization
In any CubeCOS cluster deployment, the first control host initialized becomes the master node. This node is responsible for establishing core service initialization and applying the base configuration for the cluster.
Do not proceed with additional control nodes until the first control node has completed applying the policy.
Initializing other nodes before the master node completes its setup can result in service registration failures, configuration conflicts, or an unstable cluster state.
Once the master node has completed applying the configuration, accept the configuration on all other nodes in the cluster.
    Summary
    Password has not been modified.
    Host name: control-converged
    IF.1
        Default interface.
        IPv4 Mode: Manual
        IPv4 Address: 10.32.2.230
        IPv4 Netmask: 255.255.0.0
        IPv4 Gateway: 10.32.0.254
        IPv6 Mode: Automatic
    DNS server 1: 1.1.1.1
    Time Zone: Asia/Taipei
    Date: 05/29/2025
    Time: 14:54:19
    Role: control-converged
    External IP/Domain: N/A
    Management: IF.1
    Provider: IF.1
    Overlay: IF.1
    Storage: IF.1
    Domain/Region: default/RegionOne
    Cube Secret Seed: bigstack
    Management CIDR: 10.254.0.0/16
    High Availability: disabled
    1: Accept the configuration
    2: Cancel the configuration
    3: Modify the configuration

    Select option: 1
The time required to apply the policy may vary depending on your hardware performance.
Monitor the console output. A success message will appear once the policy application is complete and the node is ready for the next step.
Policy changes were successfully applied.
Exit and re log into the console for changes to take affect
Error message
If configuration errors are detected, the installation will fail and display an error message.
Allow the node to reboot, then verify your configuration details and reconfigure the node before attempting installation again.
    Policy changes could not be applied. System must be rebooted.
    Press enter to continue: