Automatically create subdomain with a domain preset whenever a floating IP is assigned to Virtual Machine
Setting the DNS of Network
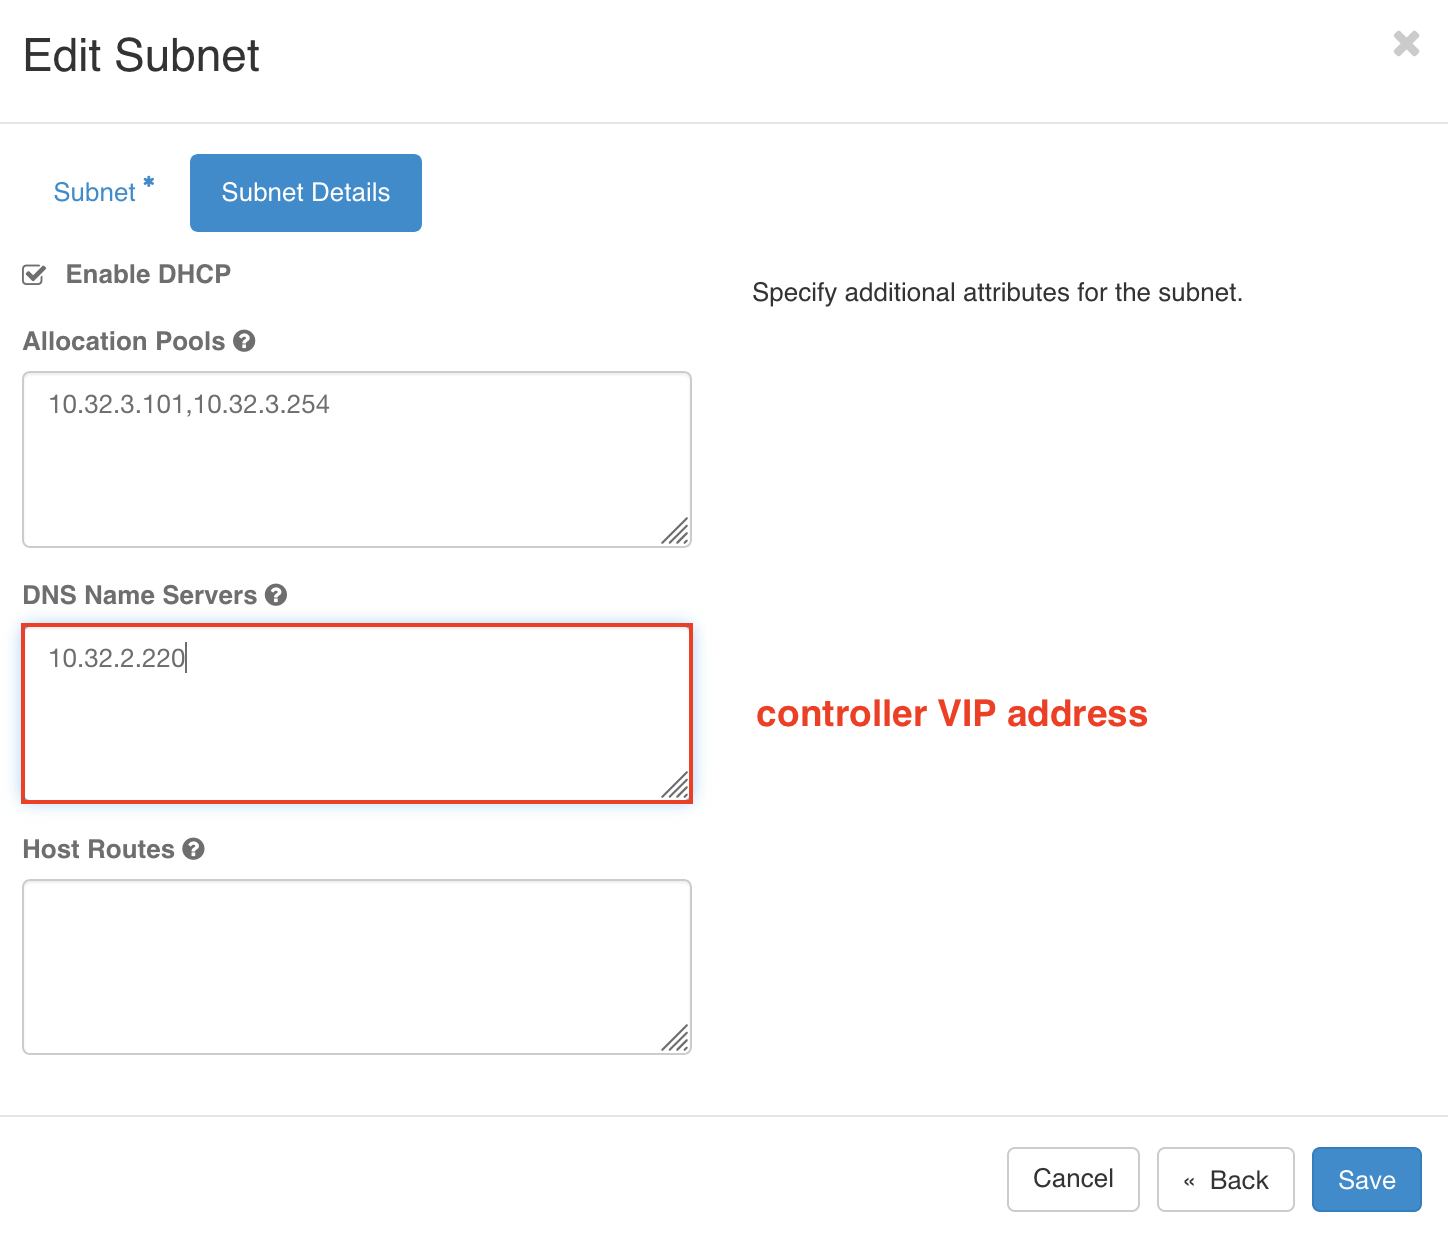
Goto Admin > Network > Networks, click on the Network Name from the list of your Networks then hit the action button EDIT SUBNET, go to Subnet Details and type in your DNS Name Servers, it should be your controller IP address or VIP and SAVE
Create DNS Zone
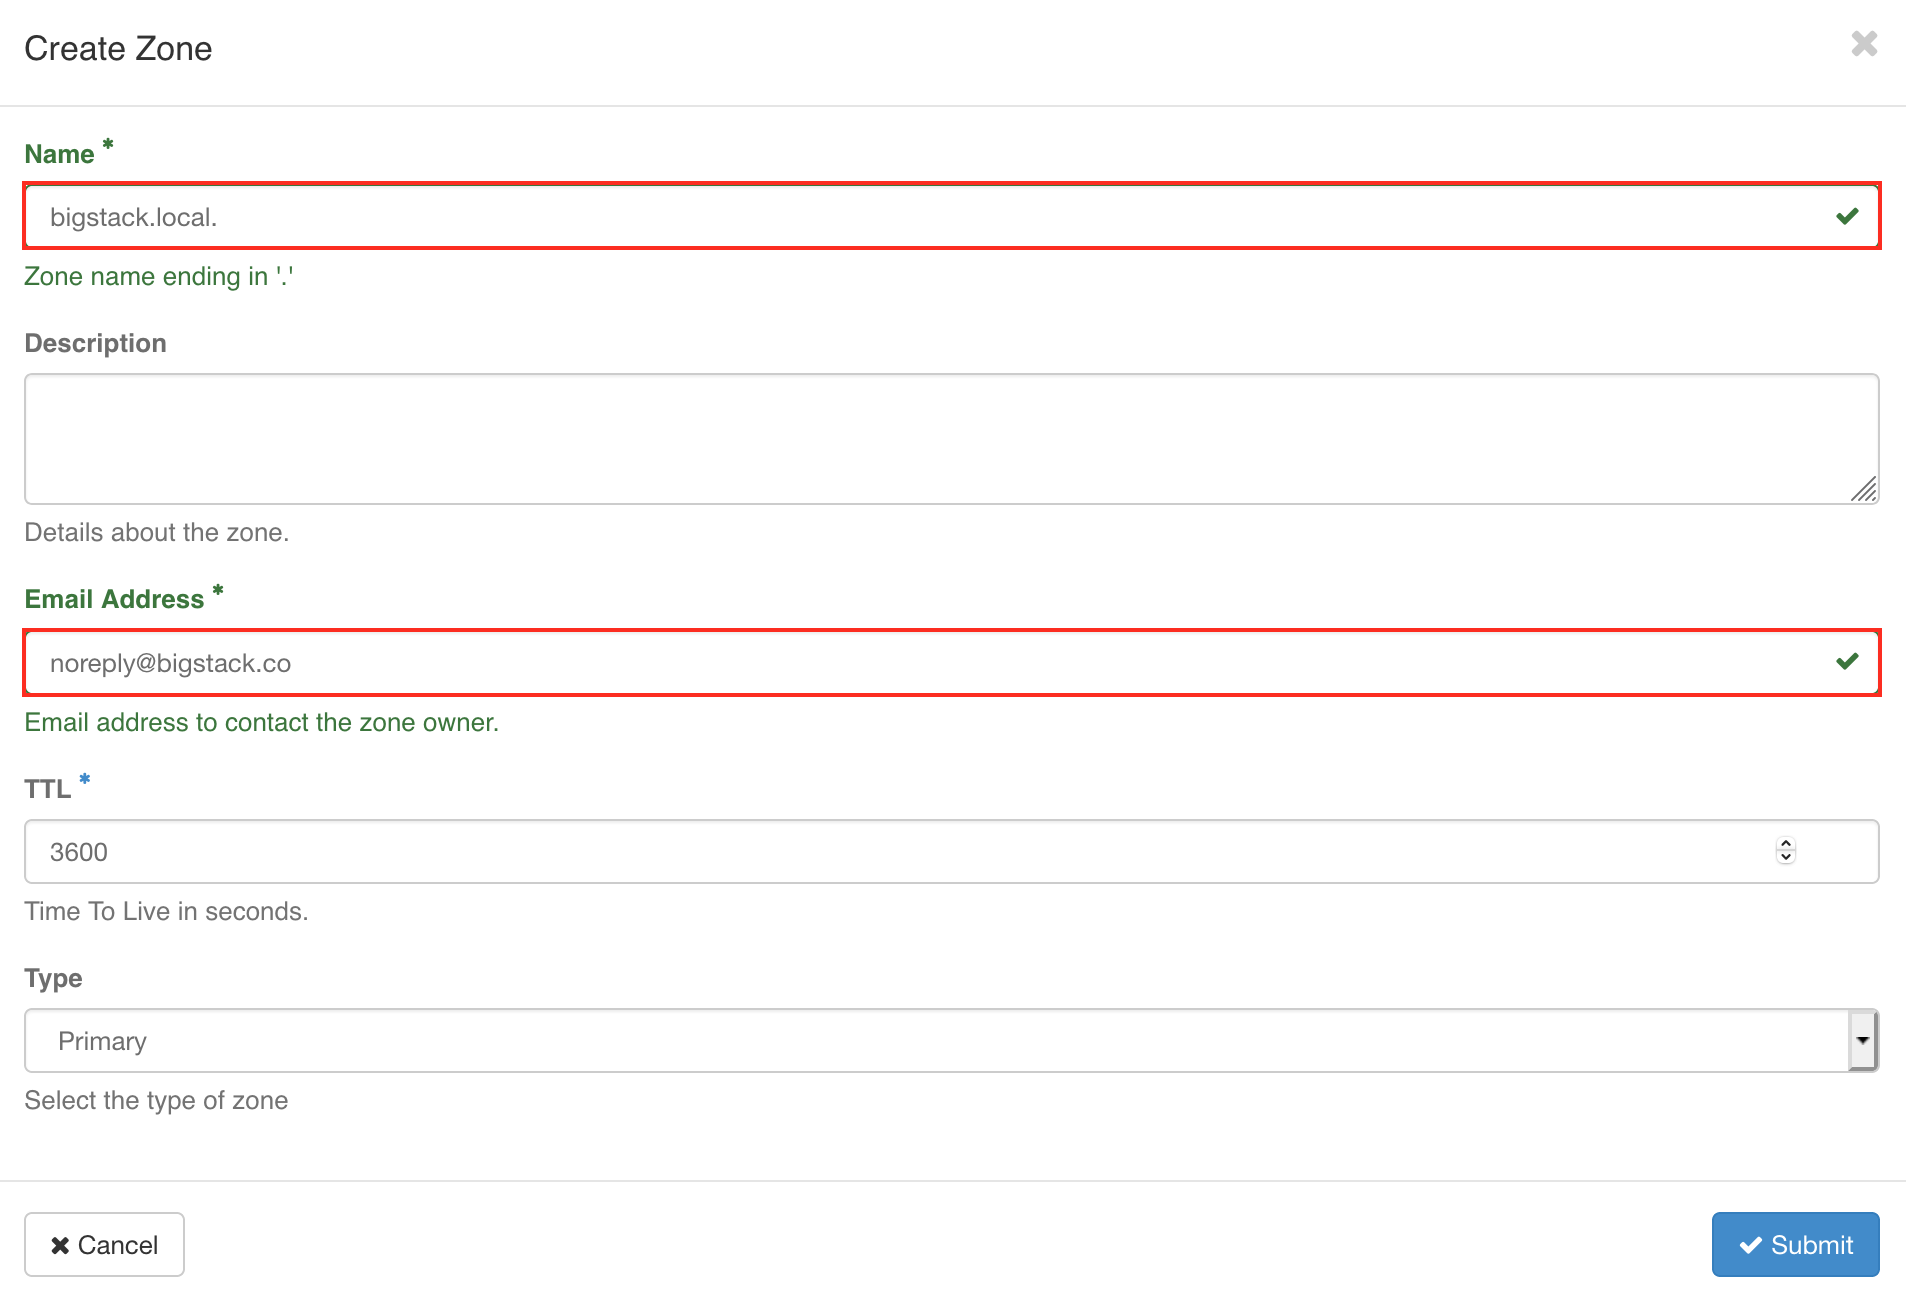
Goto Project > DNS > Zones, click on the CREATE ZONE
- create zone with a preferred/registered domain name
Connect to console
Warning: Permanently added '192.168.1.210' (ECDSA) to the list of known hosts.
Password:
Welcome to the Cube Appliance
Setting a prefix dns_domain on a private network through CLI
    cc1> iaas
    cc1:iaas> network
    cc1:network> network_set
    Select domain:
    1: Default
    Enter index: 1
    Select tenant:
    1: admin
    2: bigstack
    3: WISE-STACK
    Enter index: 2
    Select network:
    1: bigstack_pri_192_168_10_0
    Enter index: 1
    Select type:
    1: name
    2: description
    3: qos-policy
    4: no-qos-policy
    5: dns-domain
    6: no-dns-domain
    Enter index: 5
    Input value: bigstack.local.
    Updated network: ee81ff3d-1e3b-4b70-8075-d0f270c29fac
Check up the dns_domain prefix
    cc1:network> network_show
    Select domain:
    1: Default
    Enter index: 1
    Select tenant:
    1: admin
    2: bigstack
    3: WISE-STACK
    Enter index: 2
    Select network:
    1: bigstack_pri_192_168_10_0
    Enter index: 1
    +---------------------------+-----------------------------------------------------------------------------------------------------------------------------------------+
    | Field                     | Value                                                                                                                                   |
    +---------------------------+-----------------------------------------------------------------------------------------------------------------------------------------+
    | admin_state_up            | UP                                                                                                                                      |
    | availability_zone_hints   |                                                                                                                                         |
    | availability_zones        |                                                                                                                                         |
    | created_at                | 2020-11-26T06:27:34Z                                                                                                                    |
    | description               |                                                                                                                                         |
    | dns_domain                | bigstack.local.                                                                                                                         |
    | id                        | ee81ff3d-1e3b-4b70-8075-d0f270c29fac                                                                                                    |
    | ipv4_address_scope        | None                                                                                                                                    |
    | ipv6_address_scope        | None                                                                                                                                    |
    | is_default                | None                                                                                                                                    |
    | is_vlan_transparent       | None                                                                                                                                    |
    | location                  | cloud='', project.domain_id=, project.domain_name=, project.id='542b2c80d2164f36a0cfc49d6d92e2db', project.name=, region_name='', zone= |
    | mtu                       | 1442                                                                                                                                    |
    | name                      | bigstack_pri_192_168_10_0                                                                                                               |
    | port_security_enabled     | True                                                                                                                                    |
    | project_id                | 542b2c80d2164f36a0cfc49d6d92e2db                                                                                                        |
    | provider:network_type     | geneve                                                                                                                                  |
    | provider:physical_network | None                                                                                                                                    |
    | provider:segmentation_id  | 5                                                                                                                                       |
    | qos_policy_id             | None                                                                                                                                    |
    | revision_number           | 3                                                                                                                                       |
    | router:external           | Internal                                                                                                                                |
    | segments                  | None                                                                                                                                    |
    | shared                    | False                                                                                                                                   |
    | status                    | ACTIVE                                                                                                                                  |
    | subnets                   | 36c271f5-e652-43d5-930f-09a43b667a1d                                                                                                    |
    | tags                      |                                                                                                                                         |
    | updated_at                | 2020-11-26T08:48:27Z                                                                                                                    |
    +---------------------------+-----------------------------------------------------------------------------------------------------------------------------------------+
Associate Floating IP to your Instances
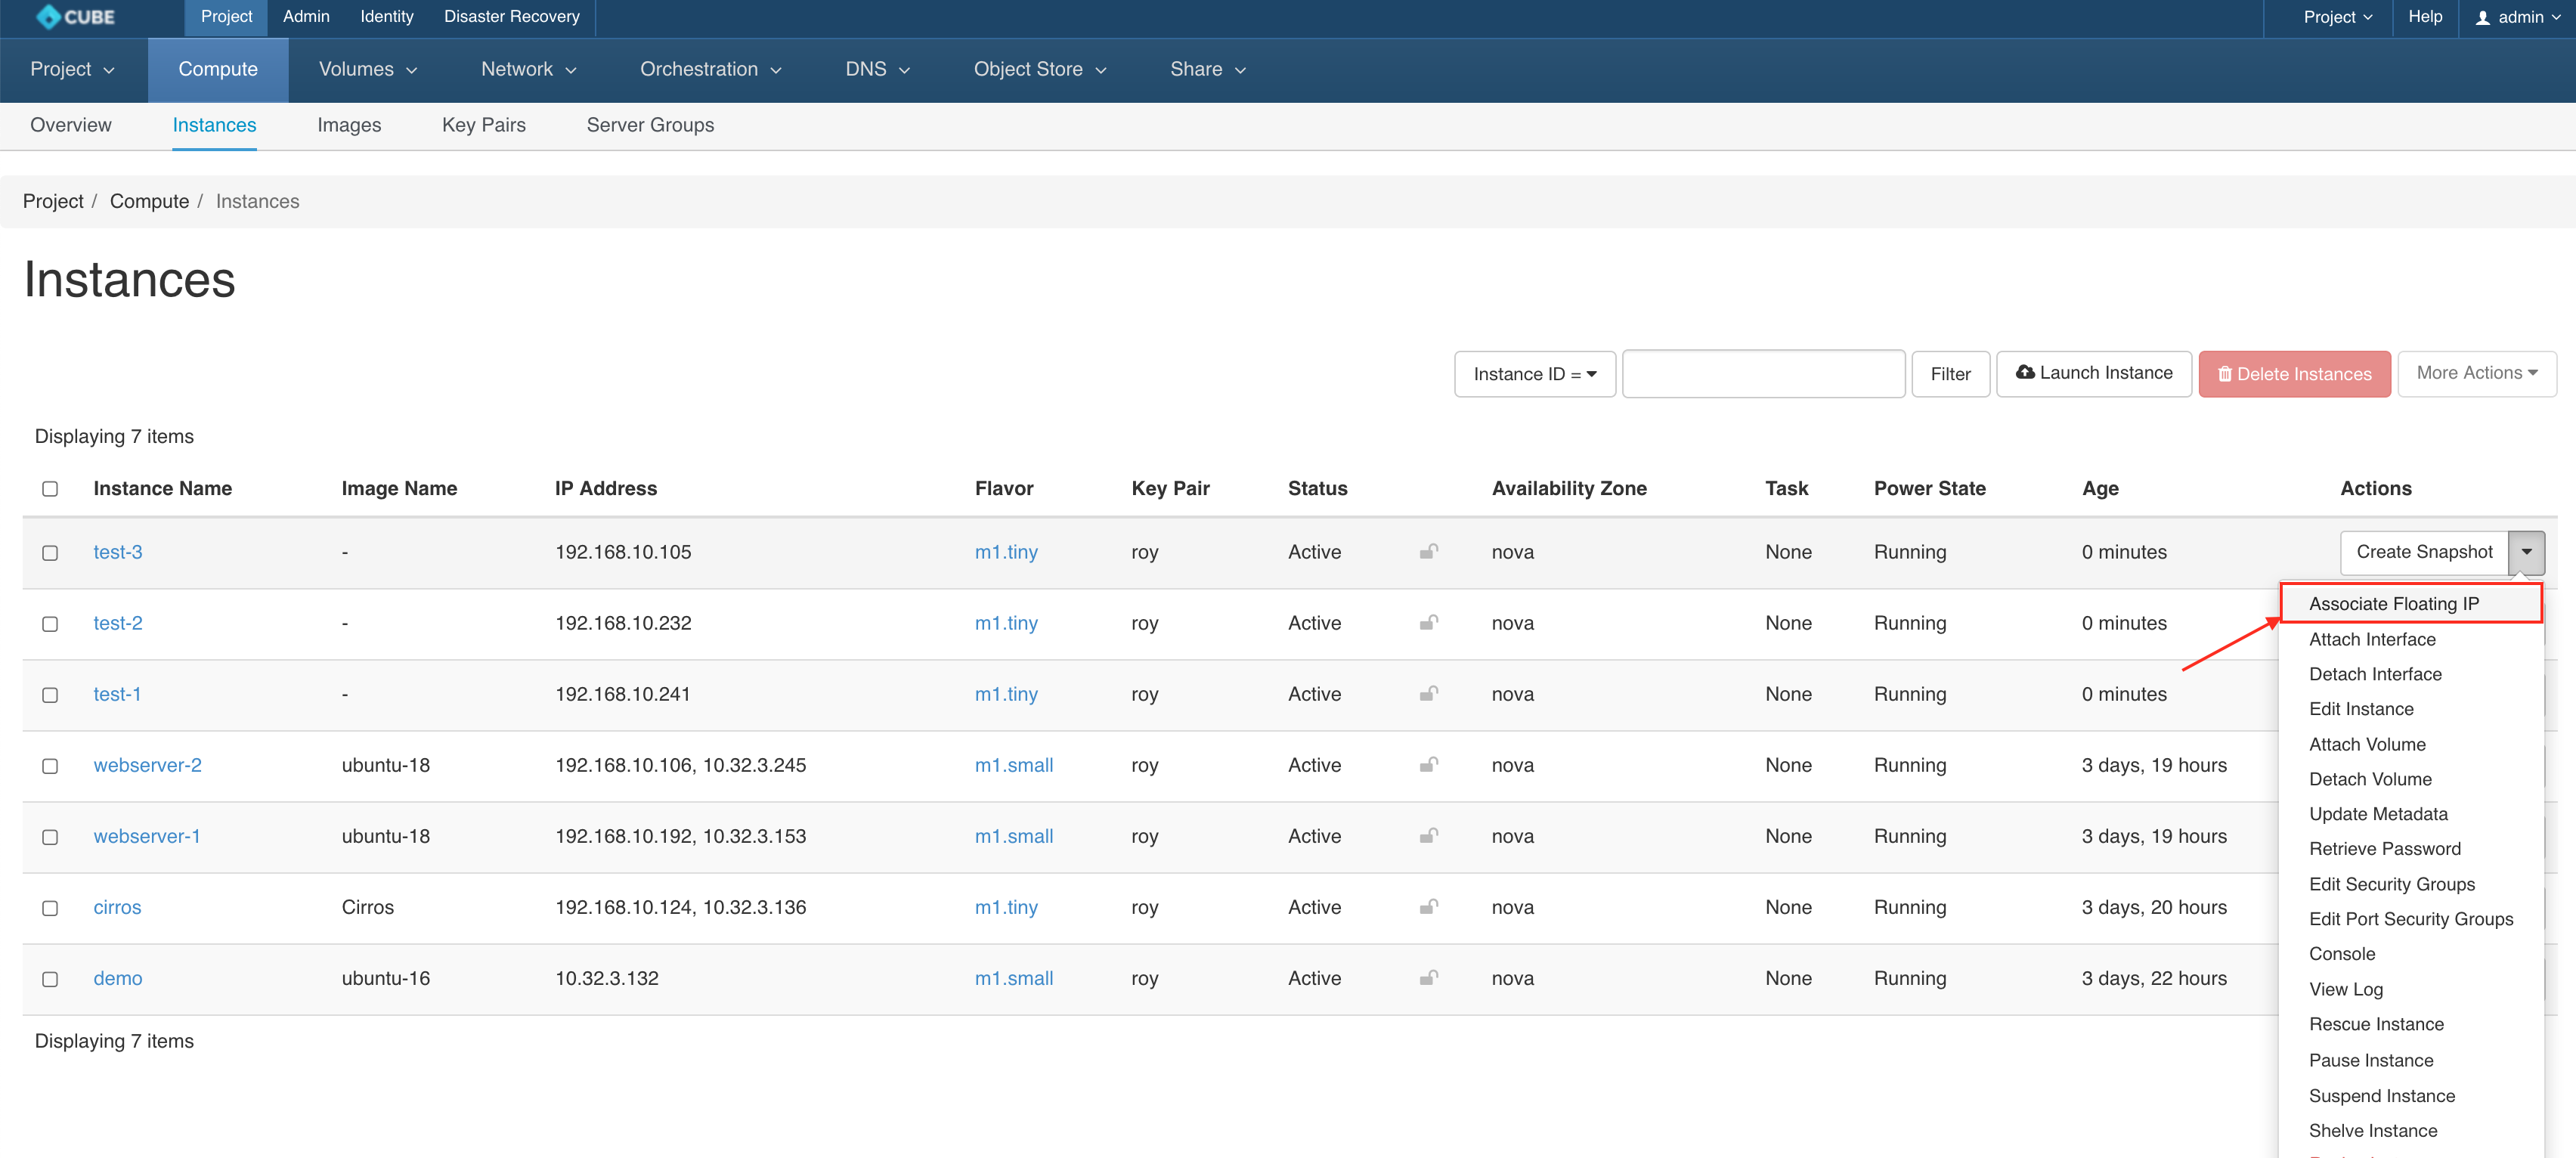
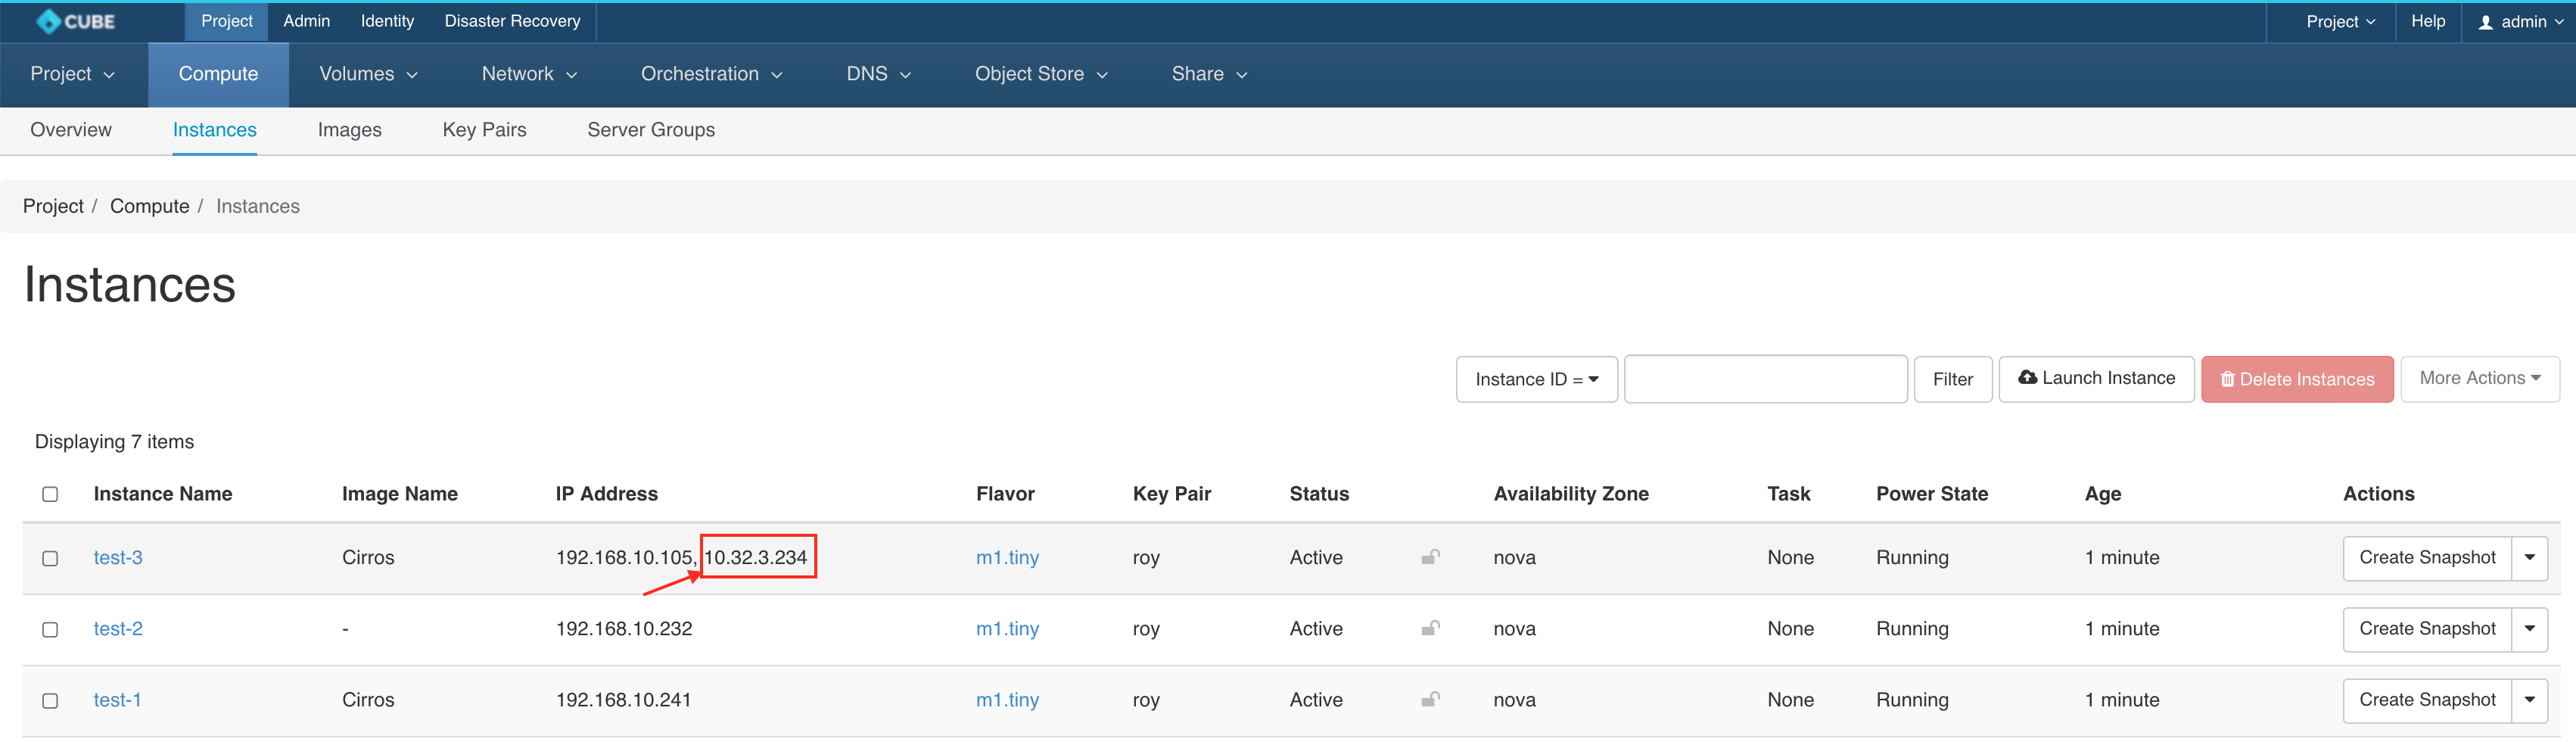
Goto Project > Compute > Instances, click on the ASSOCIATE FLOATING IP from the Actions
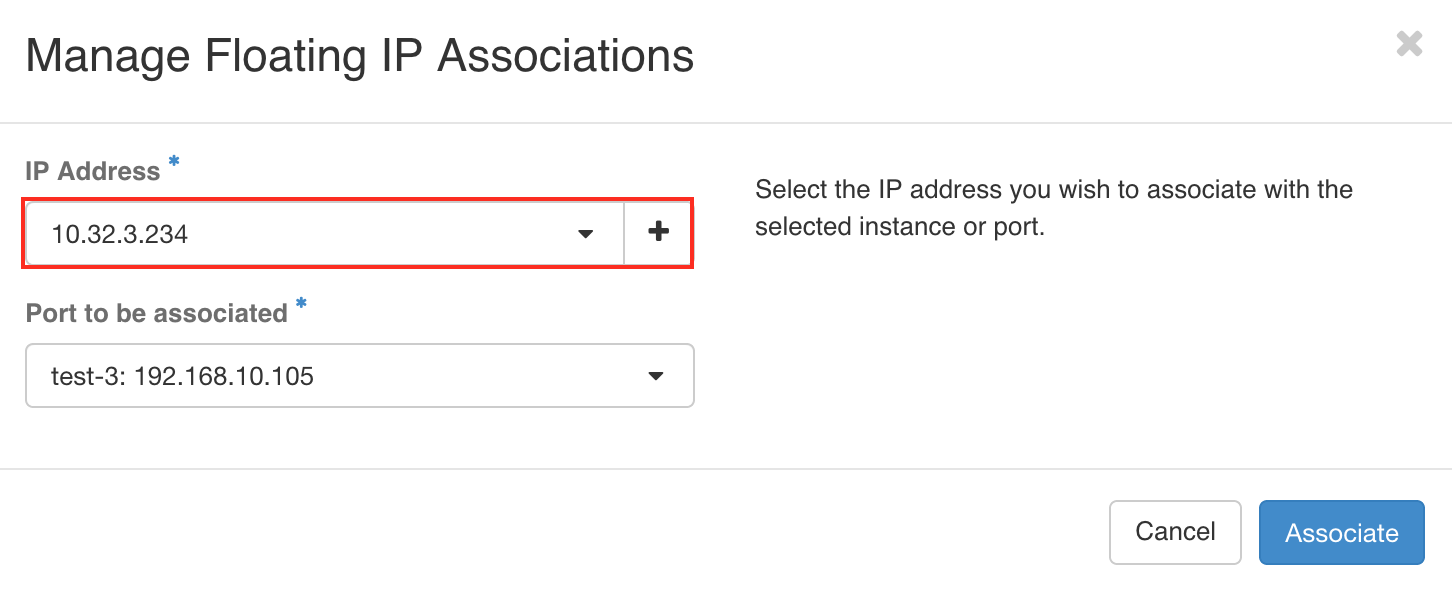
An IP 10.32.3.234 has been associated to your instance test-3
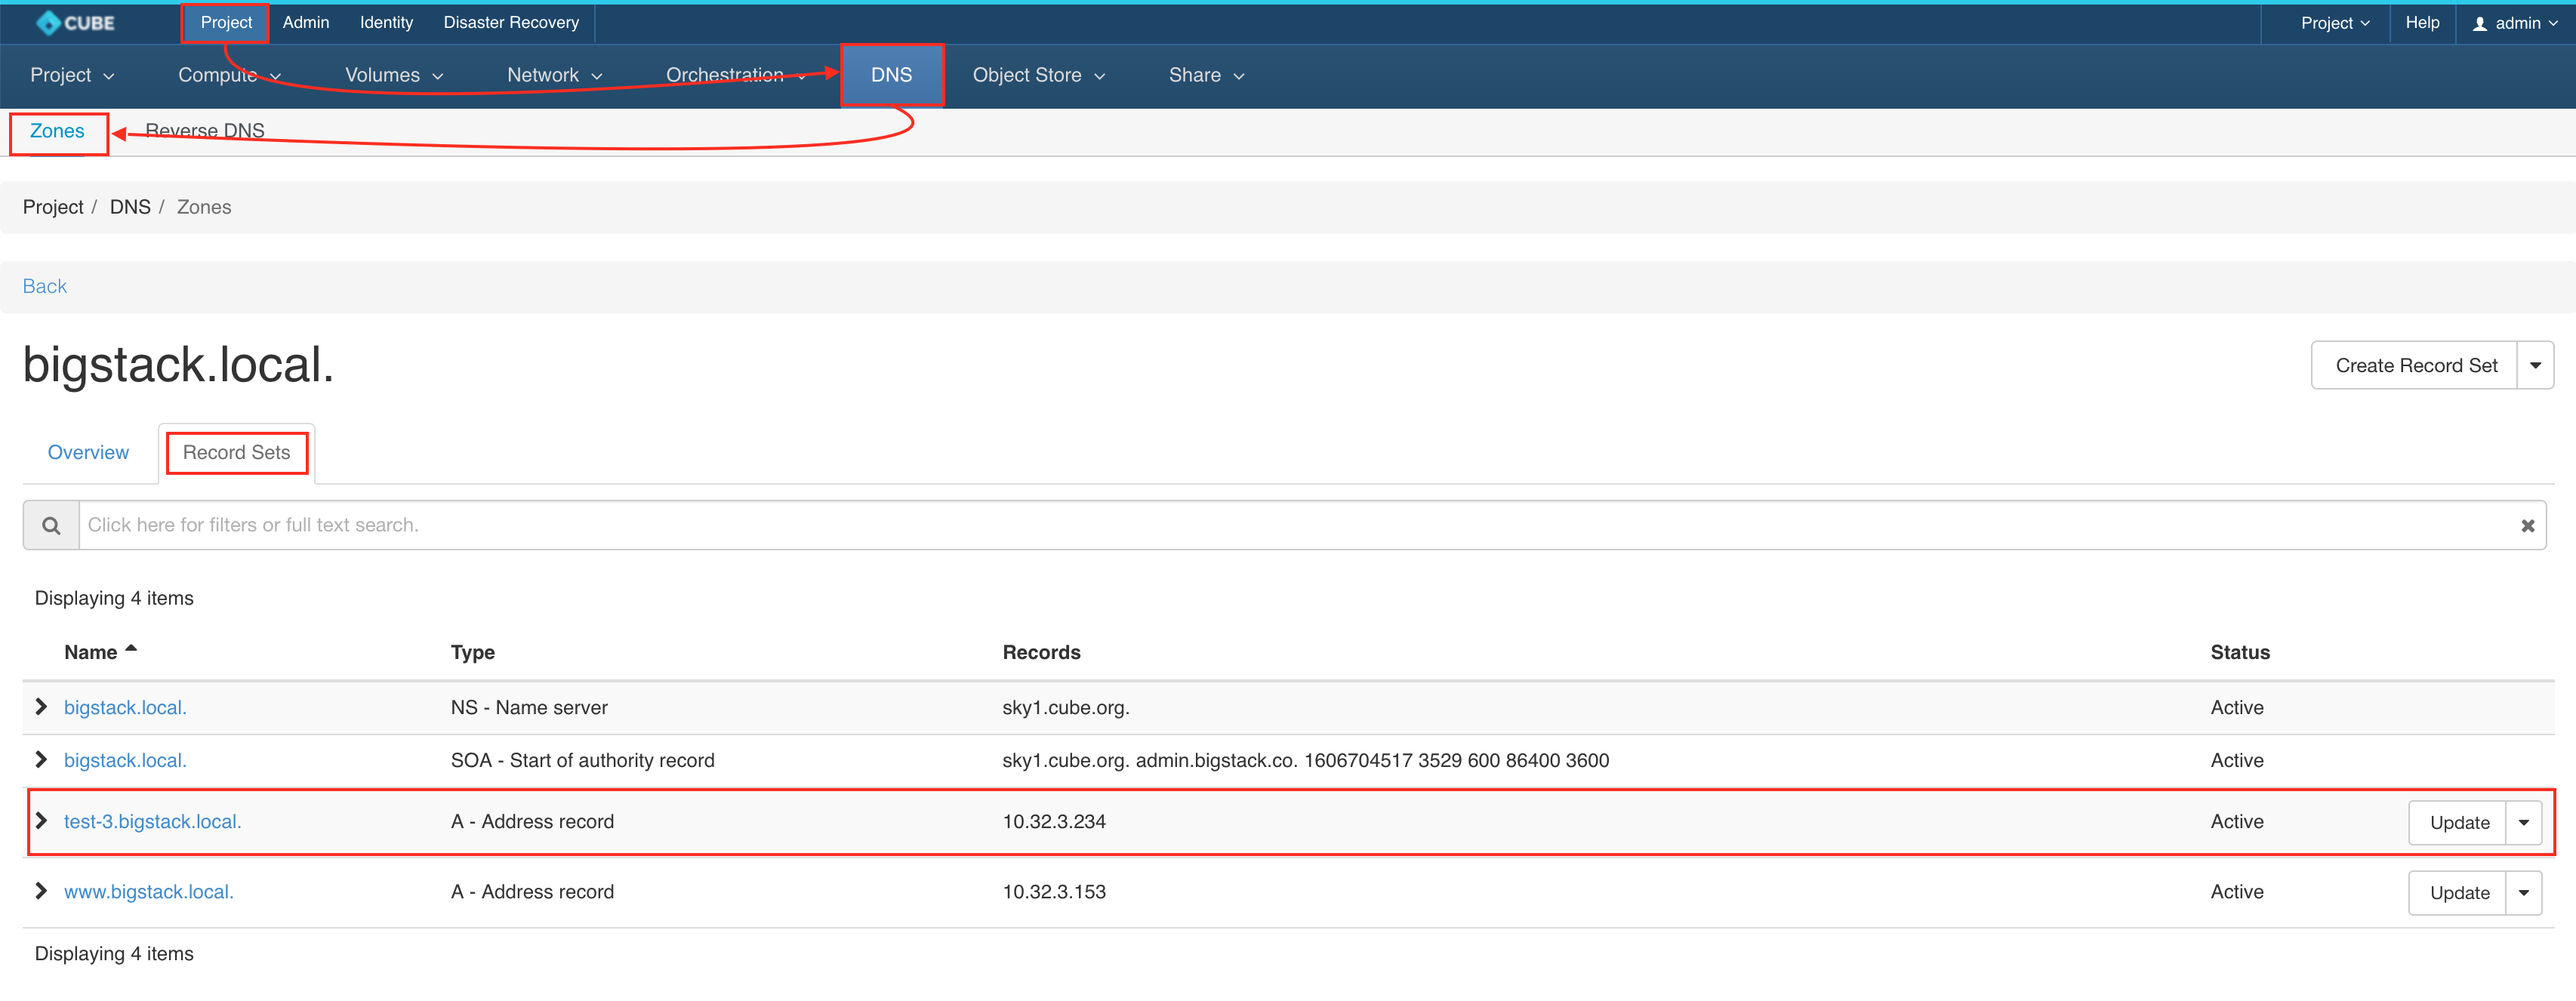
Check the zone record set of bigstack.local.
A Record has been created according to your instance's hostname test-3.bigstack.local.
Check the DNS with nslookup
- open a terminal and run
nslookup test-3.bigstack.local. 10.32.2.220
  ❯ nslookup test-3.bigstack.local. 10.32.2.220
  Server:  10.32.2.220
  Address: 10.32.2.220#53

  Name: test-3.bigstack.local
  Address: 10.32.3.234
Summary
In this use case, the address of a floating IP is published in the external DNS service in conjunction with the dns_name of its associated port and the dns_domain of the port’s network. The steps to execute in this use case are the following:
- Assign a valid domain name to the network’s dns_domain attribute. This name must end with a period (.).
- Boot an instance or alternatively, create a port specifying a valid value to its dns_name attribute. If the port is going to be used for an instance boot, the value assigned to dns_name must be equal to the hostname that the Compute service will assign to the instance. Otherwise, the boot will fail.
- Create a floating IP and associate it to the port.