# How to create a load balancer on CubeCOS

> A Load Balancer distributes incoming network traffic across multiple servers to ensure no single server becomes overwhelmed. This helps improve performance, reliability, and availability of applications.

A Load Balancer distributes incoming network traffic across multiple servers to ensure no single server becomes overwhelmed. This helps improve performance, reliability, and availability of applications.

:::info

USB storage devices are blocked by default. If accessing USB devices is needed, please set the tuning option `cubesys.probeusb` to `true` using `CLI > tuning > configure` after logging in as admin.

:::

## Prerequisite {#prerequisite}

1. Download the Amphora load balancer image: [amphora-x64-haproxy_yoga](https://s3.bigstack.co/downloads/app-image/yoga/amphora-x64-haproxy_yoga.qcow2)

## Upload and install the load balancer {#upload-and-install-the-load-balancer}

1. Upload the load balancer image to the Glance image directory `/mnt/cephfs/glance` of the CubeCOS cluster with SCP or tools like WinSCP. From a computer with management access to your cluster VIP.

   ```bash
   scp amphora-x64-haproxy_yoga.qcow2 root@<cluster-vip>:/mnt/cephfs/glance/
   ```

2. Login as `admin` to the CubeCOS cluster management VIP with SSH.
3. Import the load balancer image with the following command`image import_lb`

   ```bash
   cc1> image import_lb
   1: usb
   2: local
   Enter index: 2
   1: amphora-x64-haproxy_yoga.qcow2
   Enter index: 1
   Importing...
   [13:49:33] Converting image to RAW format ...
         (100.00/100%)
   [13:49:36] Creating image amphora-x64-haproxy ...
   [=============================>] 100%
   b726a8b9-d6a8-492c-8102-9247c252d779
   [13:50:04] Finished creating image amphora-x64-haproxy
   Importing  complete. It is safe to remove the local image file.
   ```

## Test the load balancer functionality {#test-the-load-balancer-functionality}

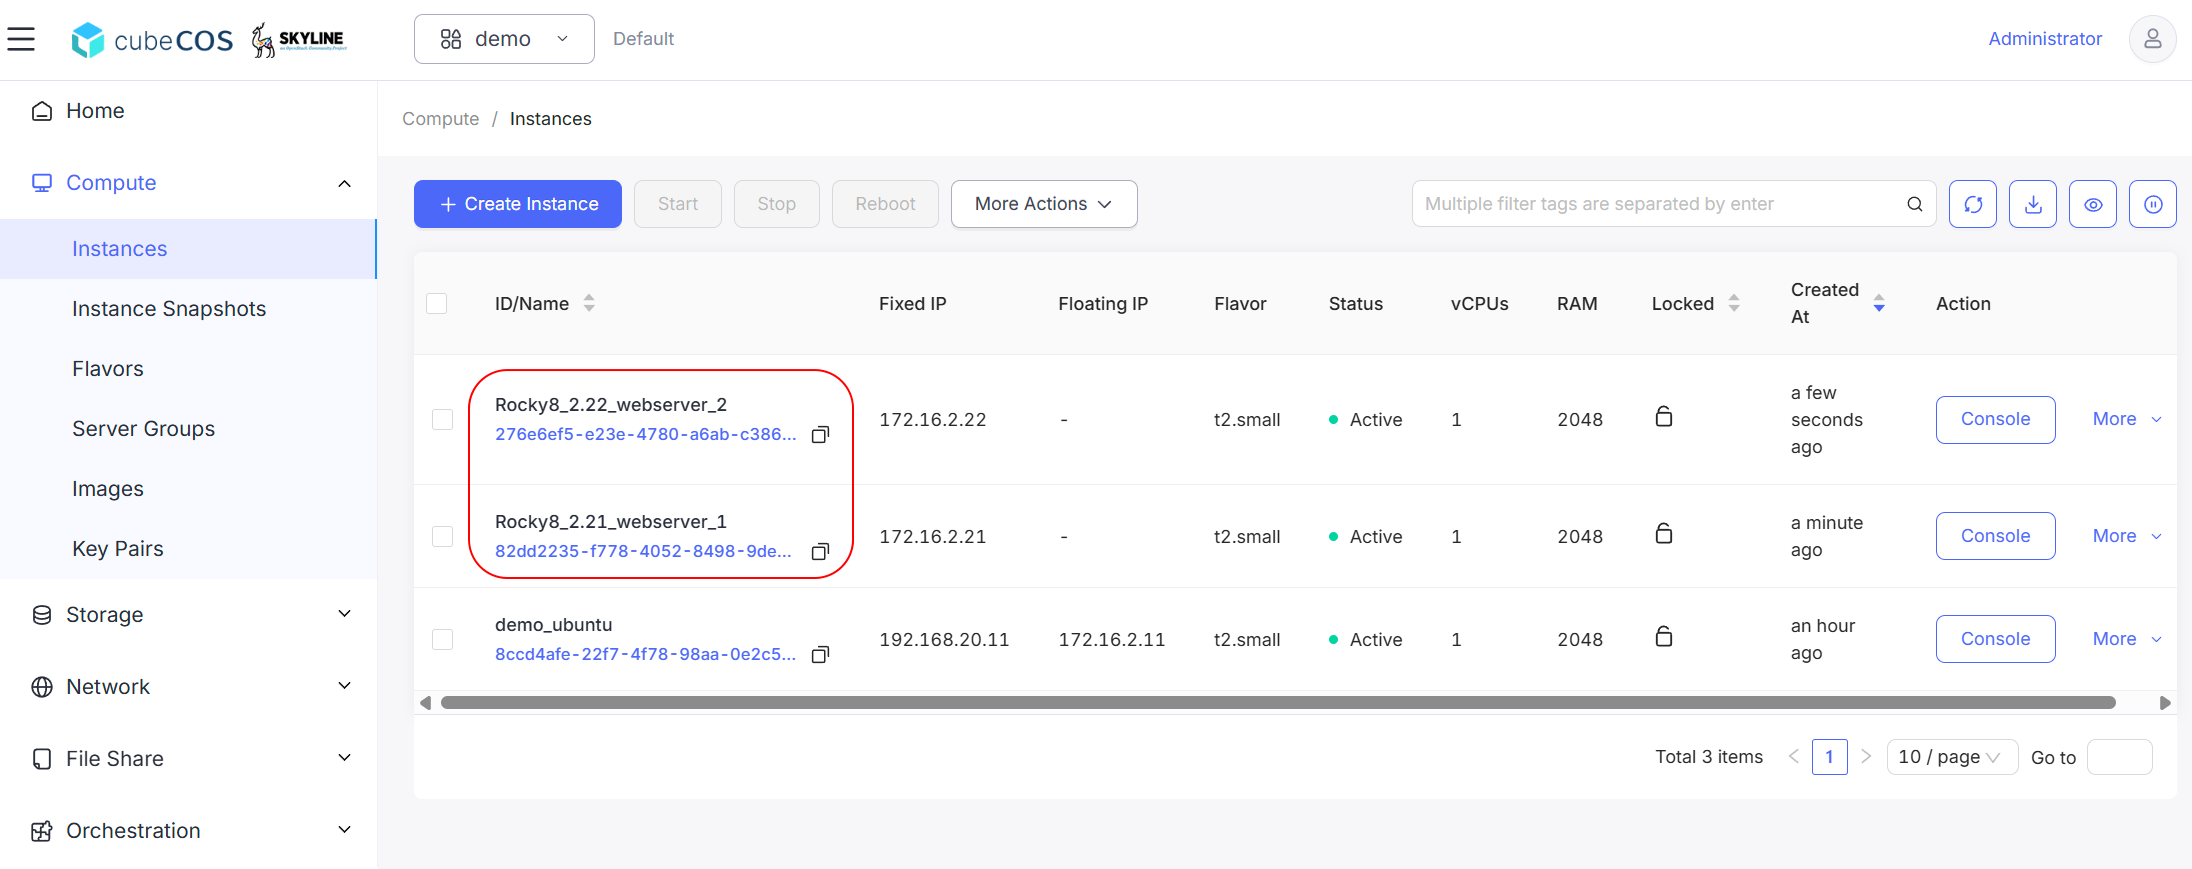
Setup at least two instances to be members in load balancer pool.

:::info

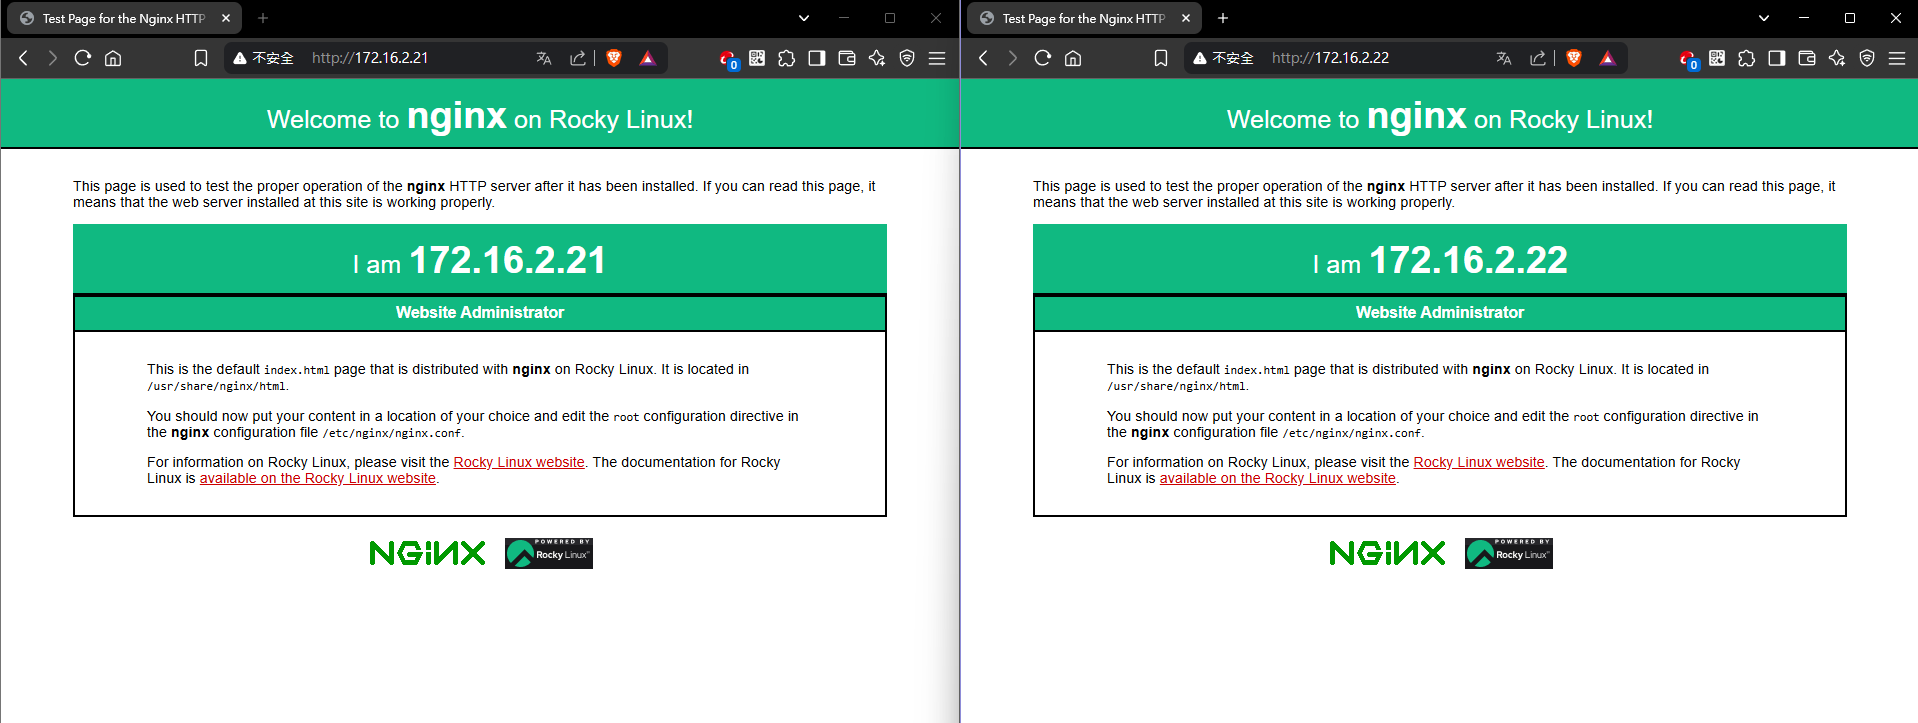
The demonstration below shows how to set up two Rocky8 web server instances with Nginx and the HTTP protocol on port 80 for hosting a website.

:::

![/assets/network/lb_create_1.png](/assets/network/lb_create_1.png)
![/assets/network/lb_create_3.png](/assets/network/lb_create_3.png)

### Create Load Balancer {#create-load-balancer}

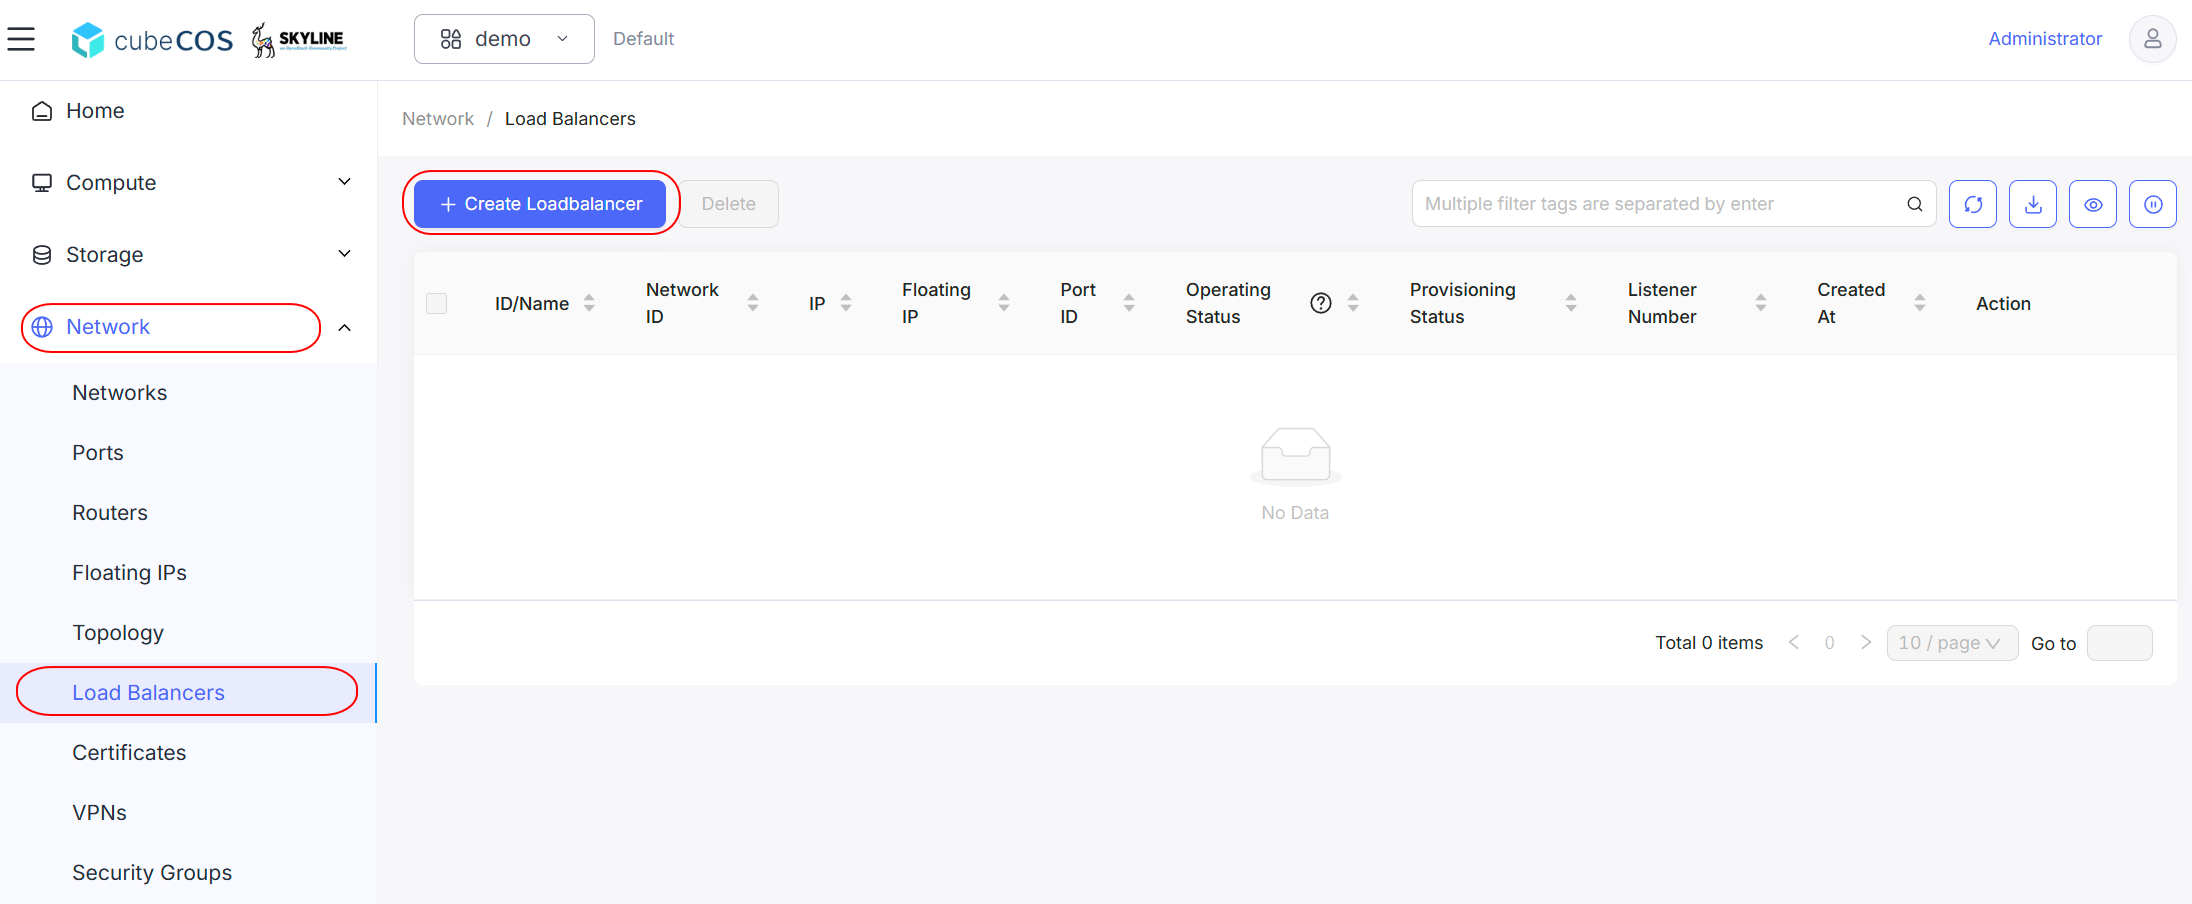
1. Navigate to `Project > Network > Load Balancers` > `+ Create Load Balancer`.

![/assets/network/lb_create_2.png](/assets/network/lb_create_2.png)

2. There are five configuration steps to complete before creating load balancer.
   - **Base Config**
   - **Listener Detail**
   - **Pool Detail**
   - **Member Detail**
   - **Health Monitor Detail**

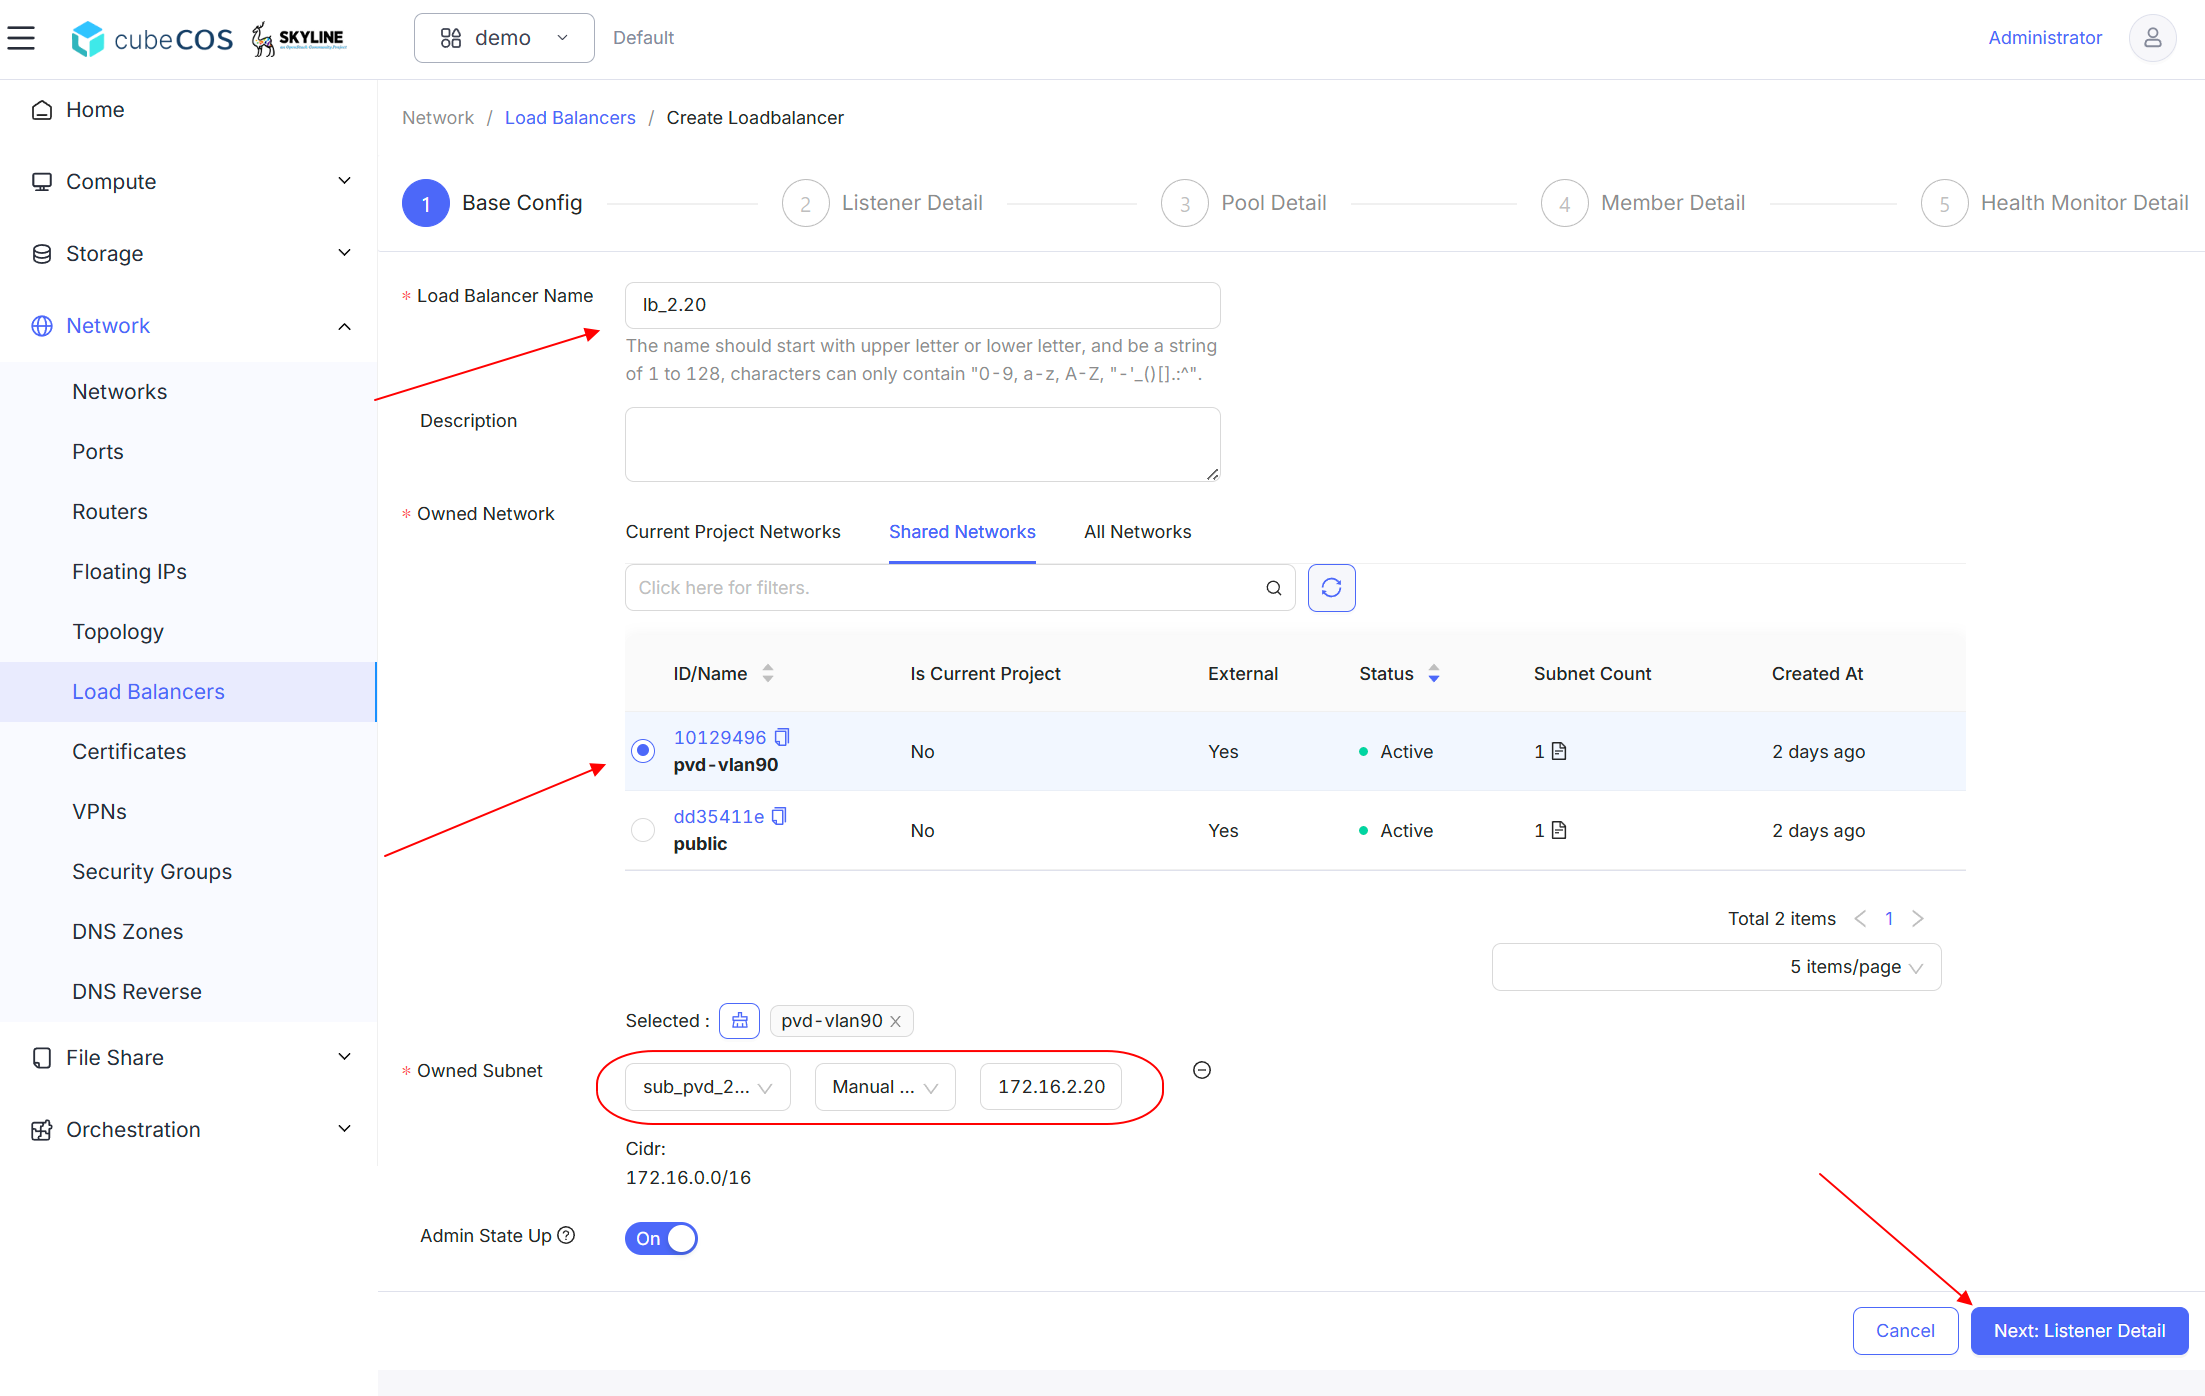
3. Base Config
   - **\*Load Balancer Name** : Input the desired load balancer name.
   - **Description** : Additional description of the load balancer.
   - **\*Owned Network** : Select the desired network interfaces and subnets for the load balancer.
   - **Admin State Up** : Defines the admin state of the port(Defaul On).

   ![/assets/network/lb_create_4.png](/assets/network/lb_create_4.png)

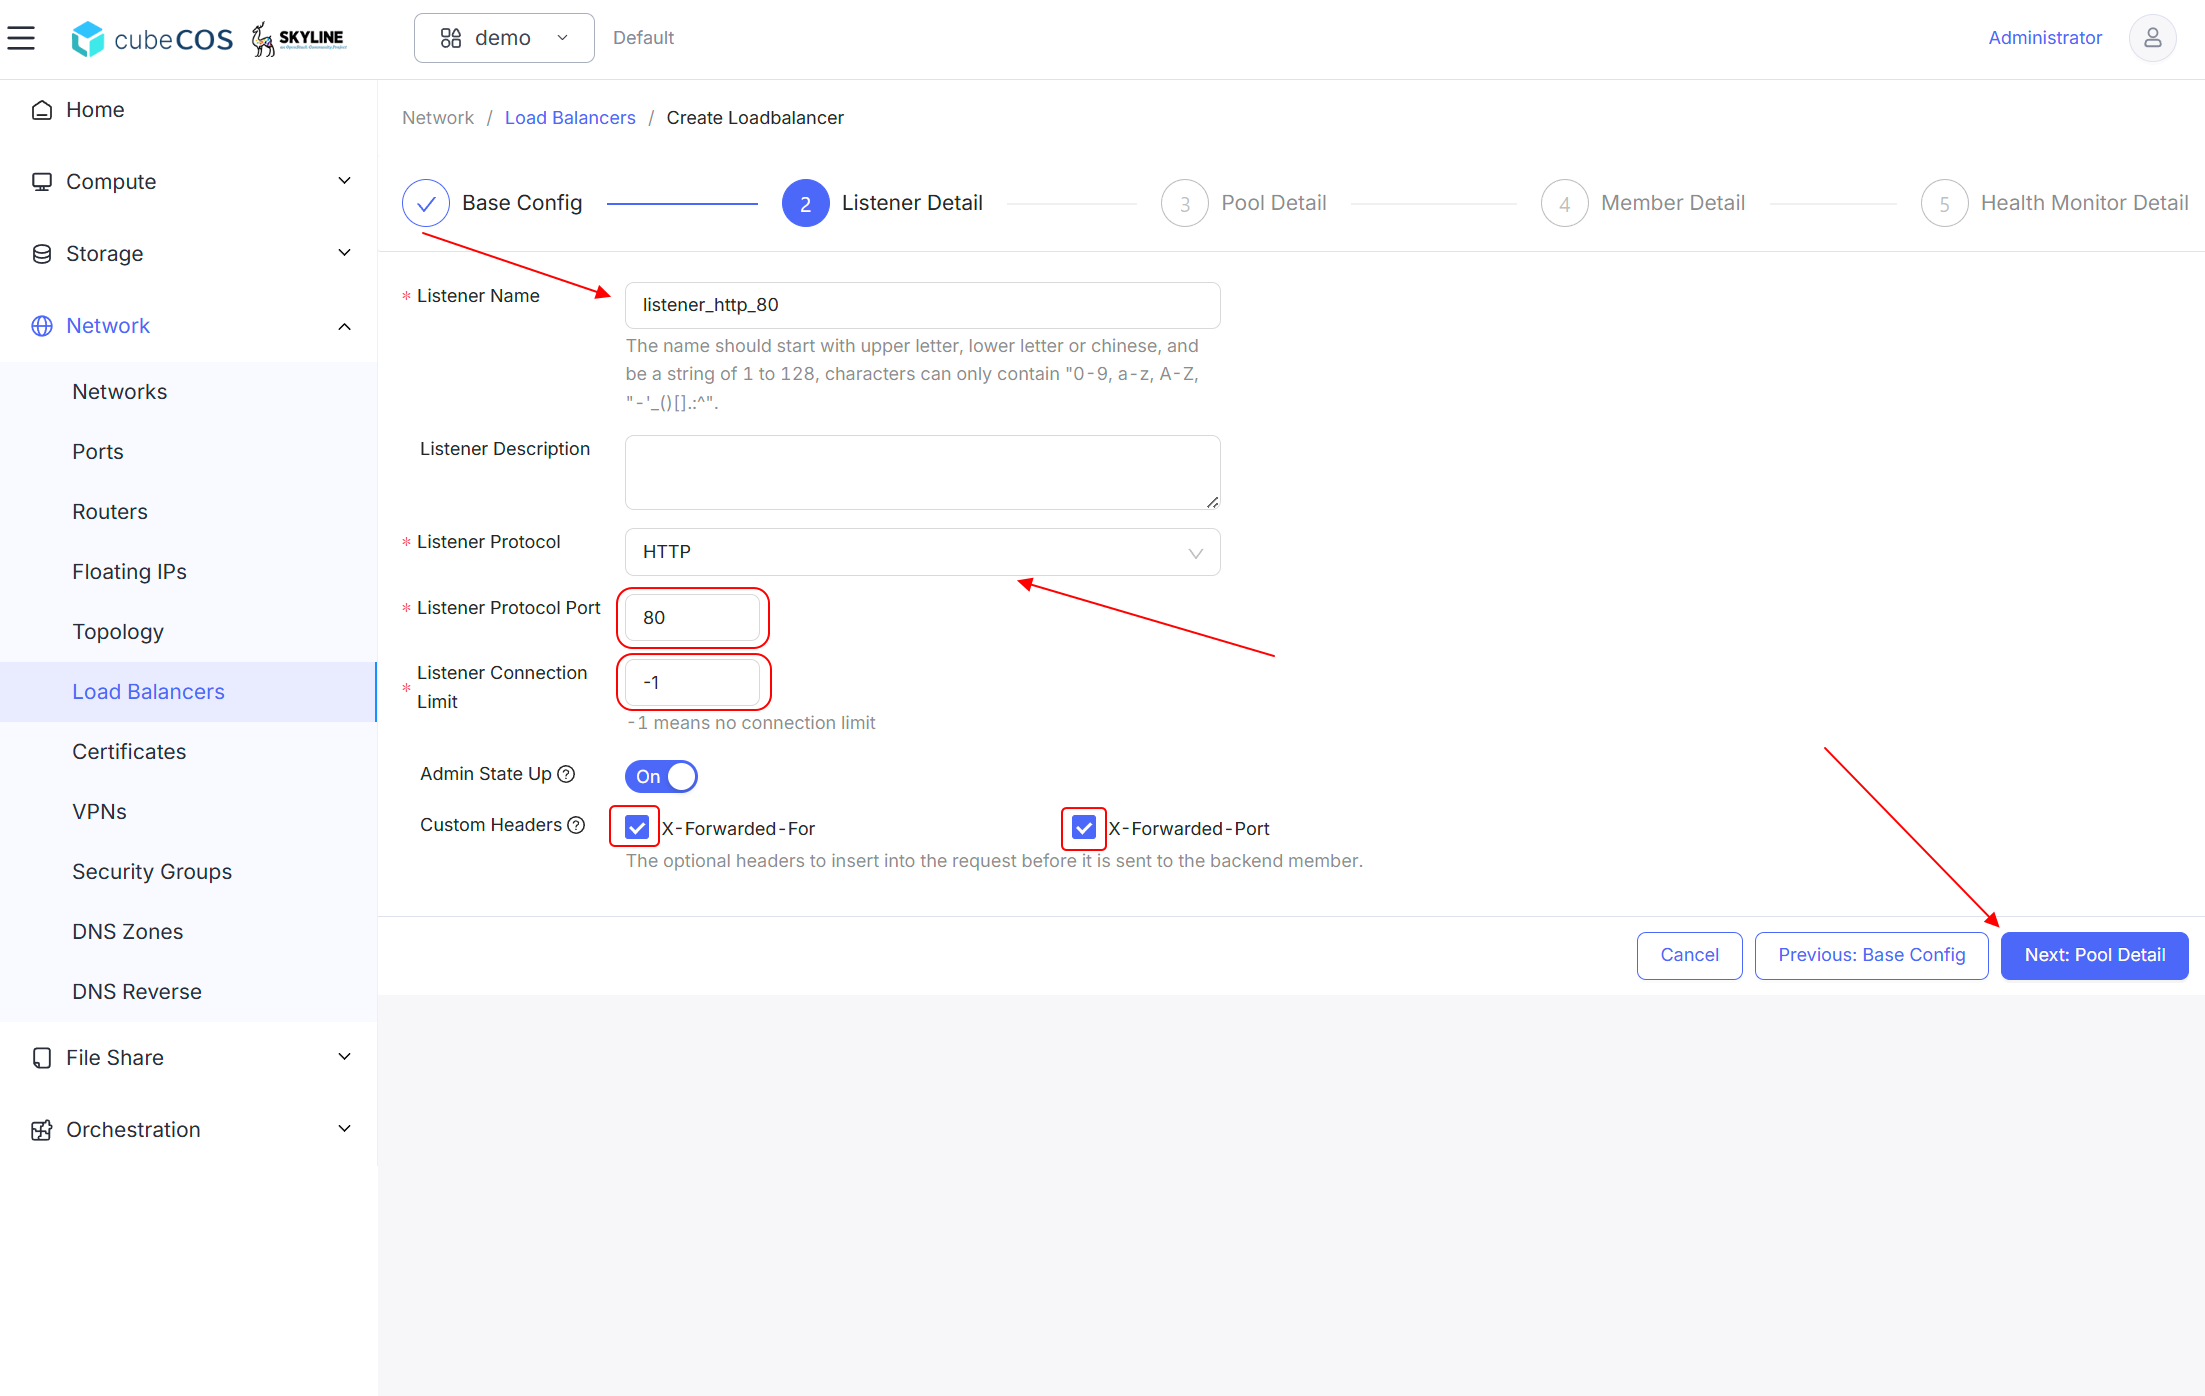
4. Listener Detail
   - **\*Listener Name** : Input the desired listener name.
   - **Listener Description** : Additional description of the listener.
   - **\*Listener Protocol** : Select the desired protocol for the listener.Supported Protocol types listed below
     - **HTTP**
     - **TCP**
     - **HTTPS**
     - **UDP**

   - **\*Listener Protocol Port** : Port for listener through protocol selected above.
   - **\*Listener Connection Limit** : limitation counts of connections to the listener at the same time(Defaul -1).

     _-1 means no connection limit_

   - **Admin State Up** : Defines the admin state of the listener(Defaul On).
   - **Custom Headers** : Optional headers to insert into the request before it is sent to the backend member
     - **X-Forwarded-For** : Specify the client IP address
     - **X-Forwarded-Port** : Specify the listener port

   ![/assets/network/lb_create_5.png](/assets/network/lb_create_5.png)

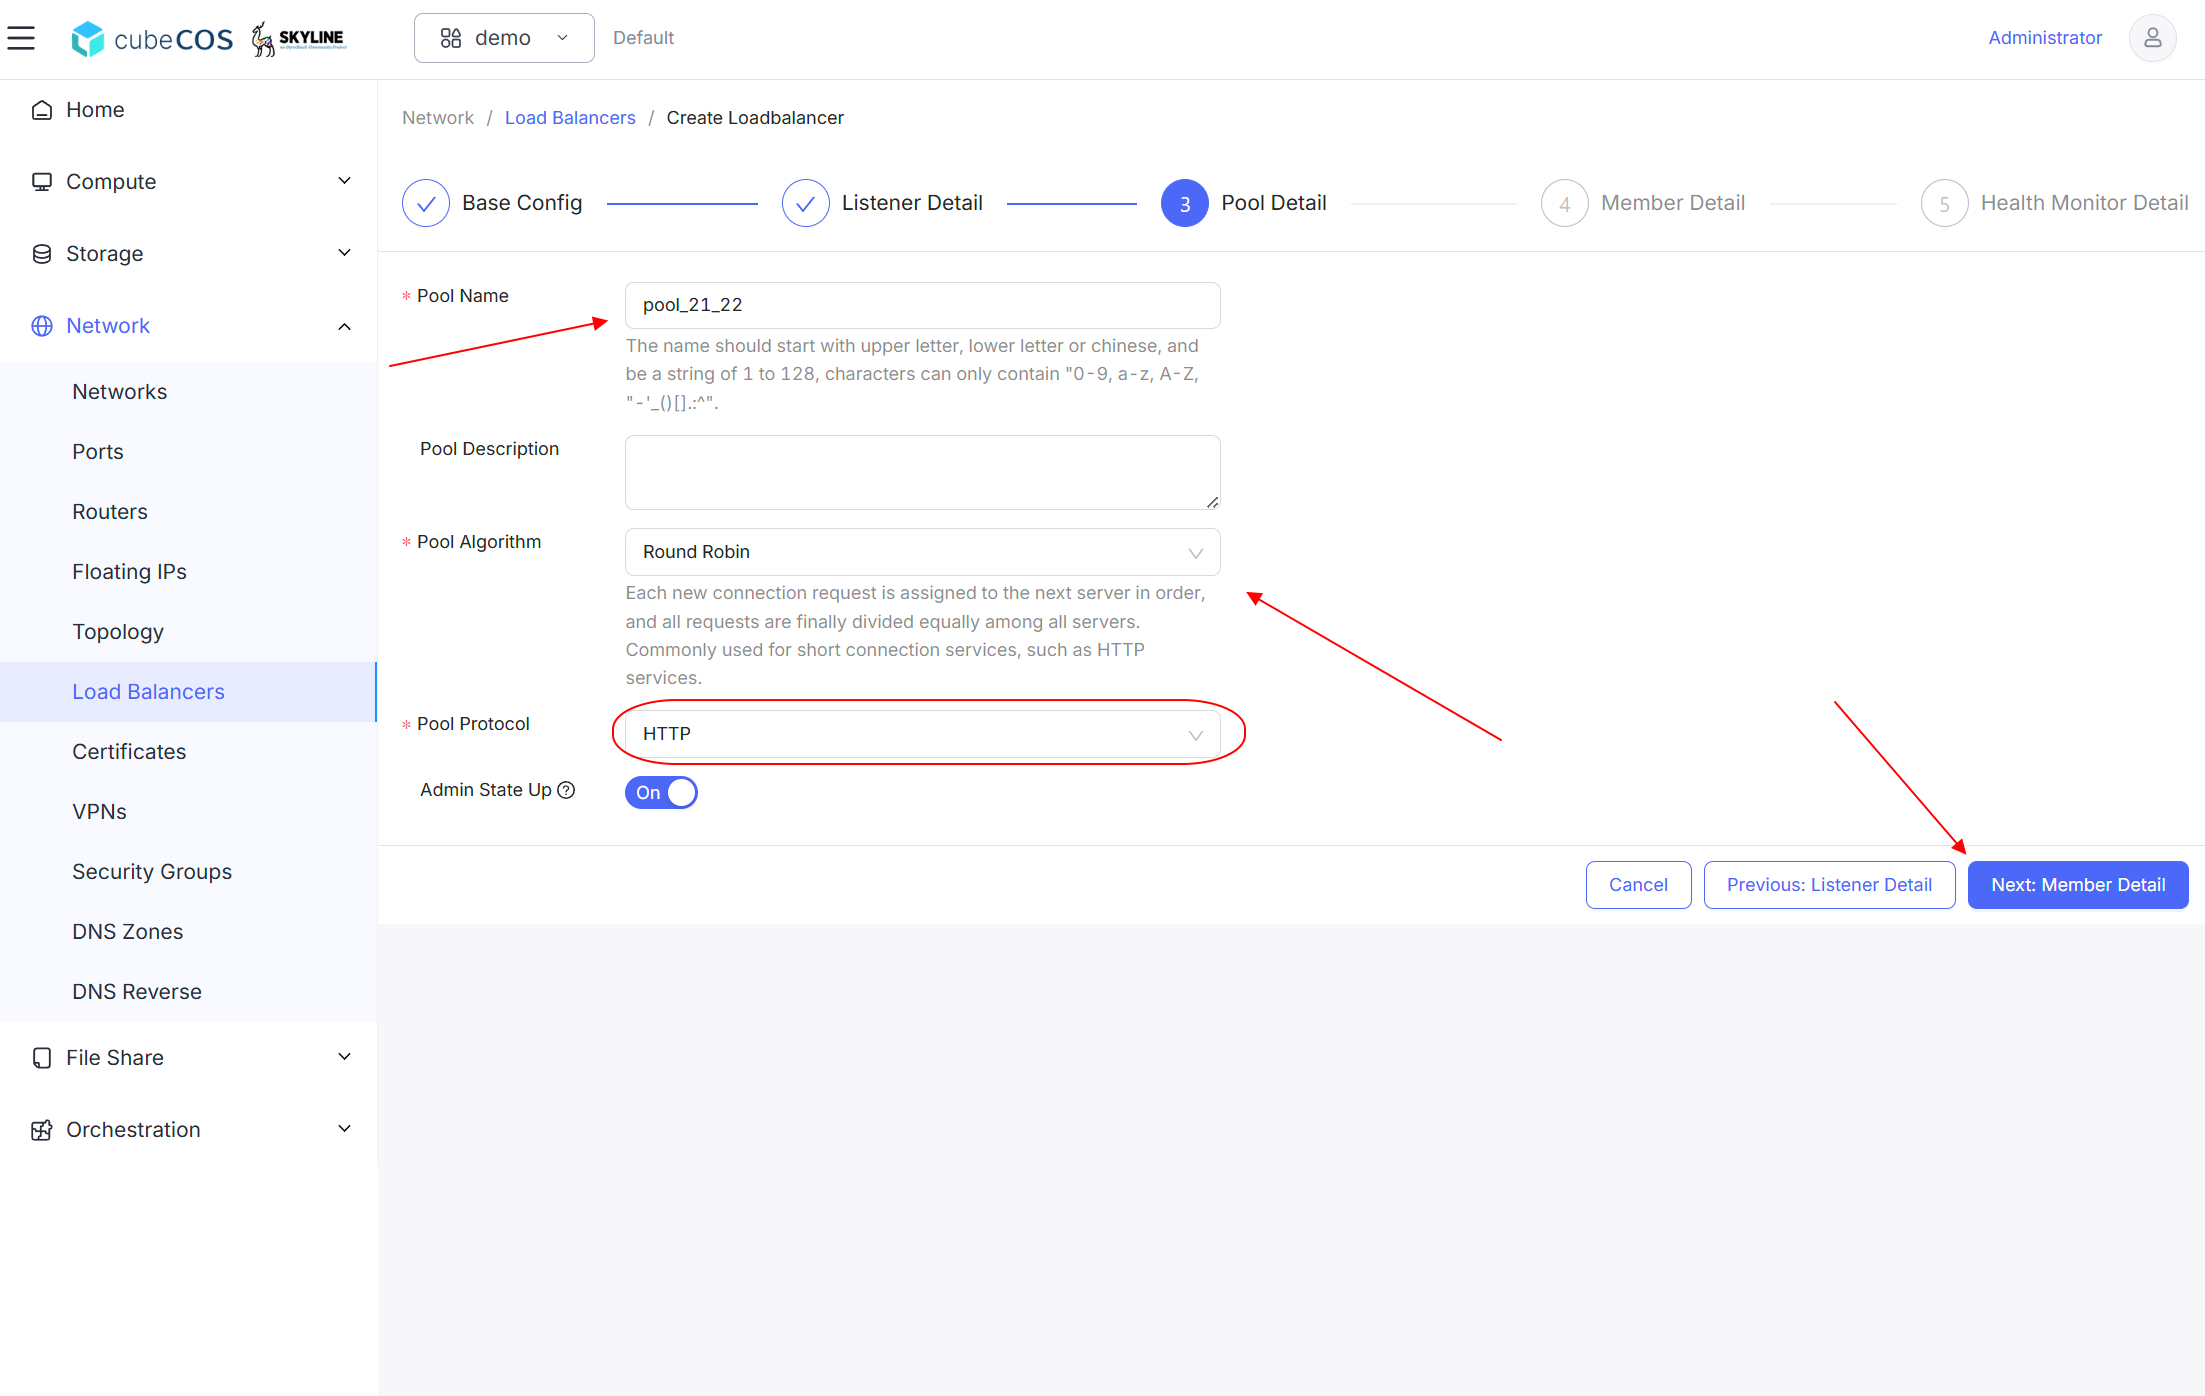
5. Pool Detail :
   - **\*Pool Name** : Input the desired pool name.
   - **Pool Description** : Additional description of the pool.
   - **\*Pool Algorithm** : Select the desired algorithm for the pool. Supported Algorithm types listed below
     - **Least Connections**
     - **Round Robin**
     - **Source IP**

   - **\*Pool Protocol** : Select the desired protocol for the pool. Based on `Listener Protocol` selection set up before.

   - **Admin State Up** : Defines the admin state of the pool(Defaul On).

   ![/assets/network/lb_create_6.png](/assets/network/lb_create_6.png)

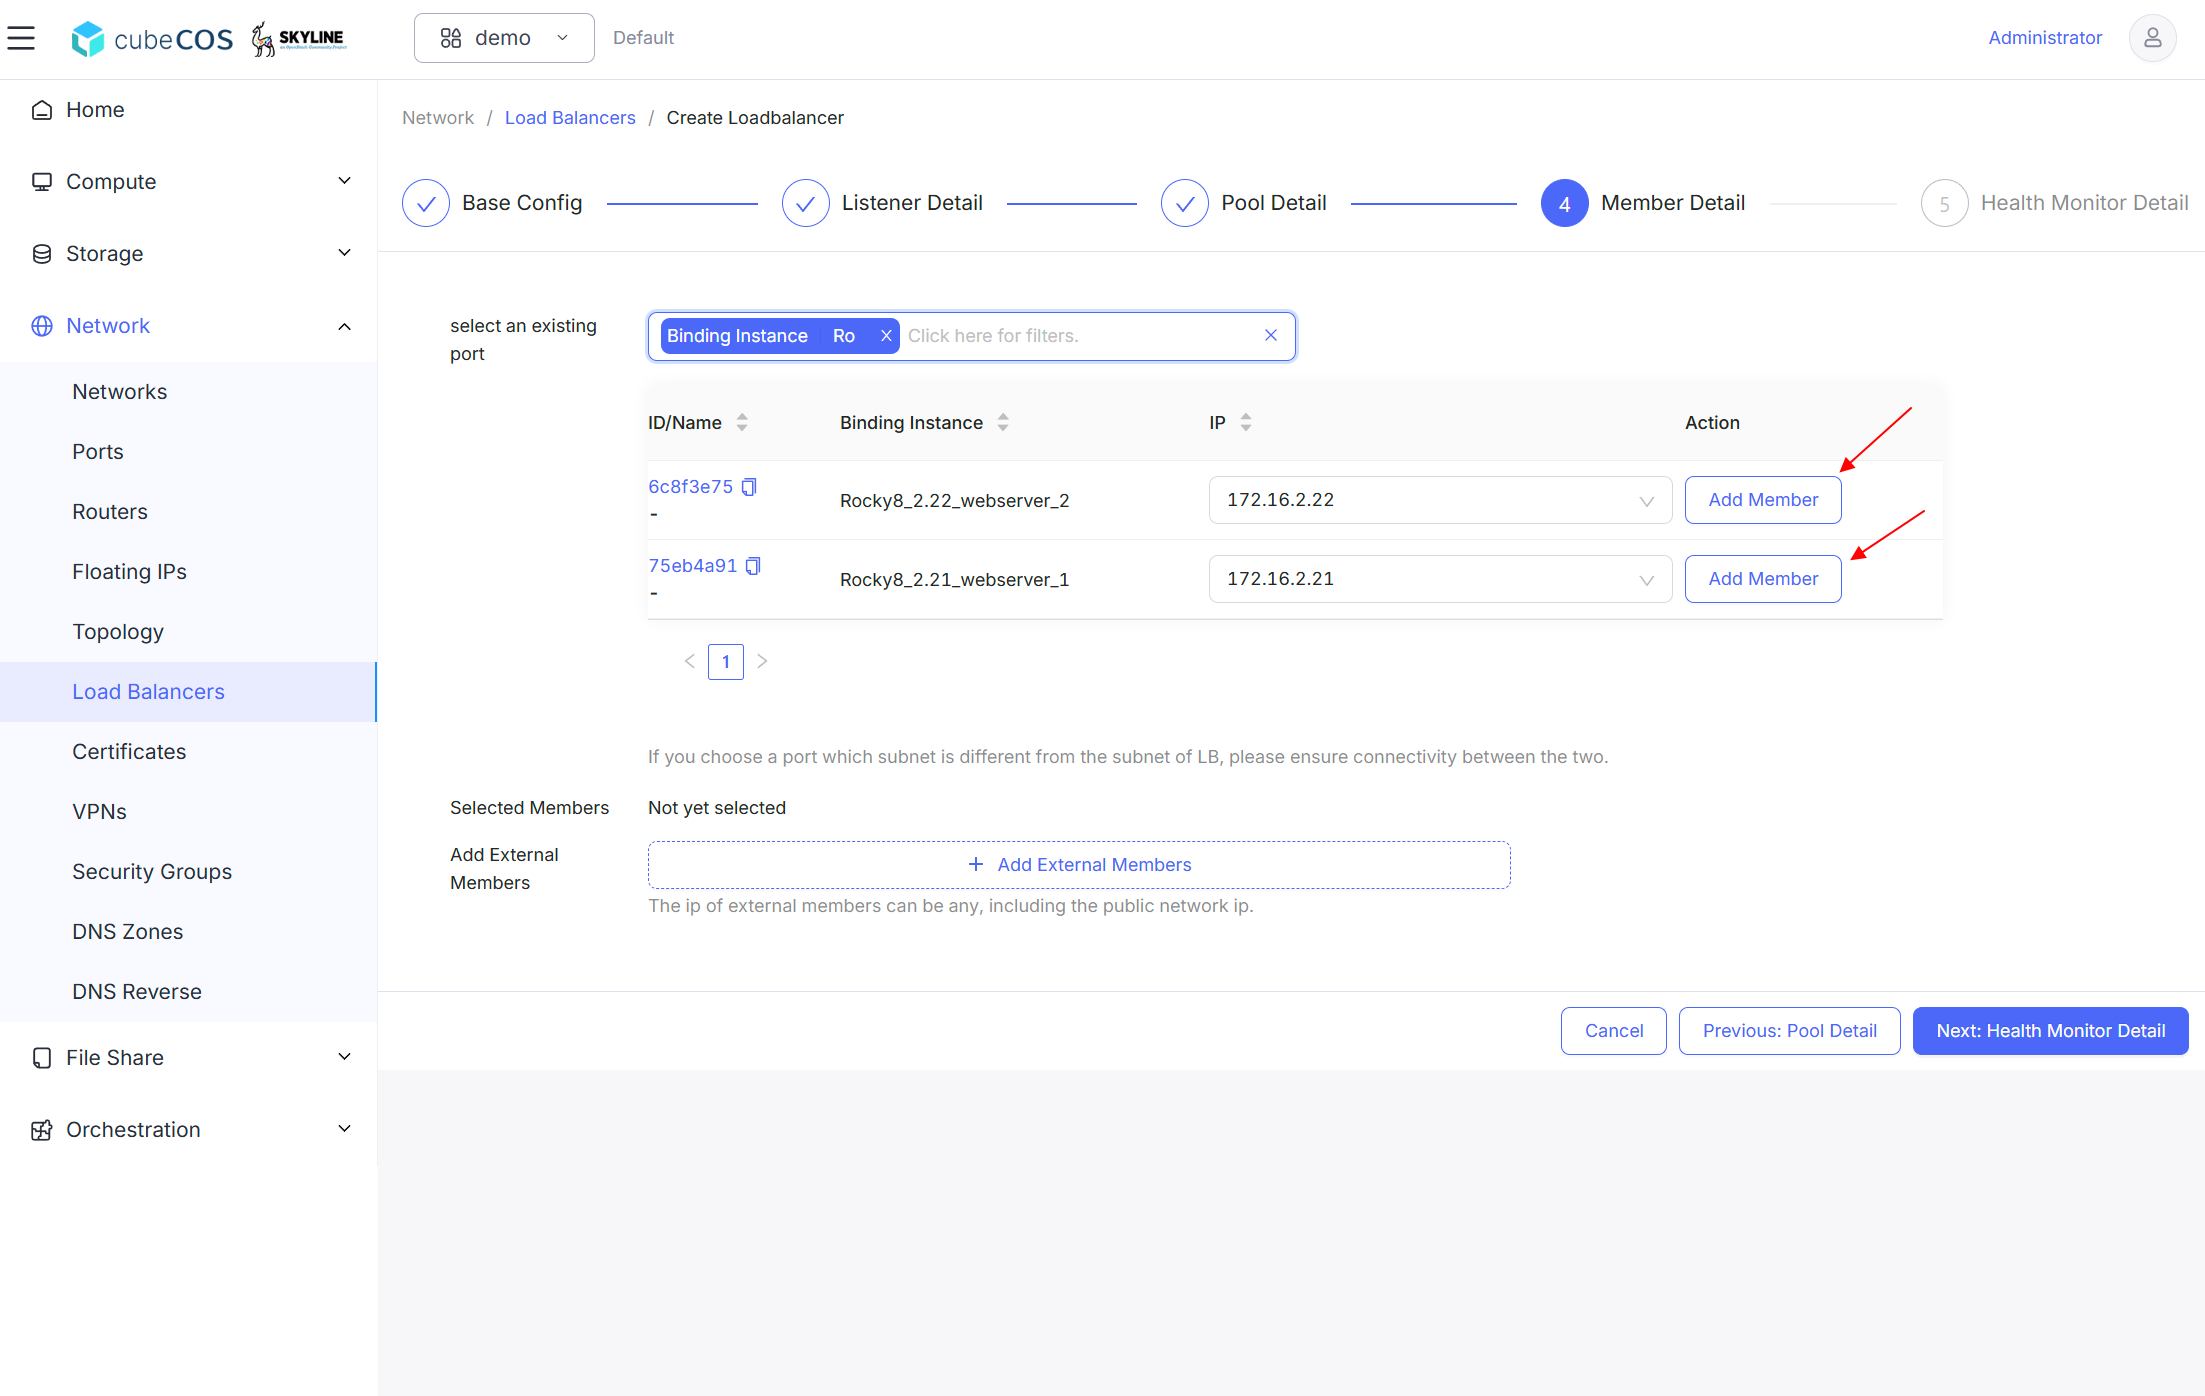
6. Member Detail

   Select exsist intances from `select an existing port`. Members will be add to `Selected Members` by clicking `Add Member` button.

   ![/assets/network/lb_create_7.png](/assets/network/lb_create_7.png)

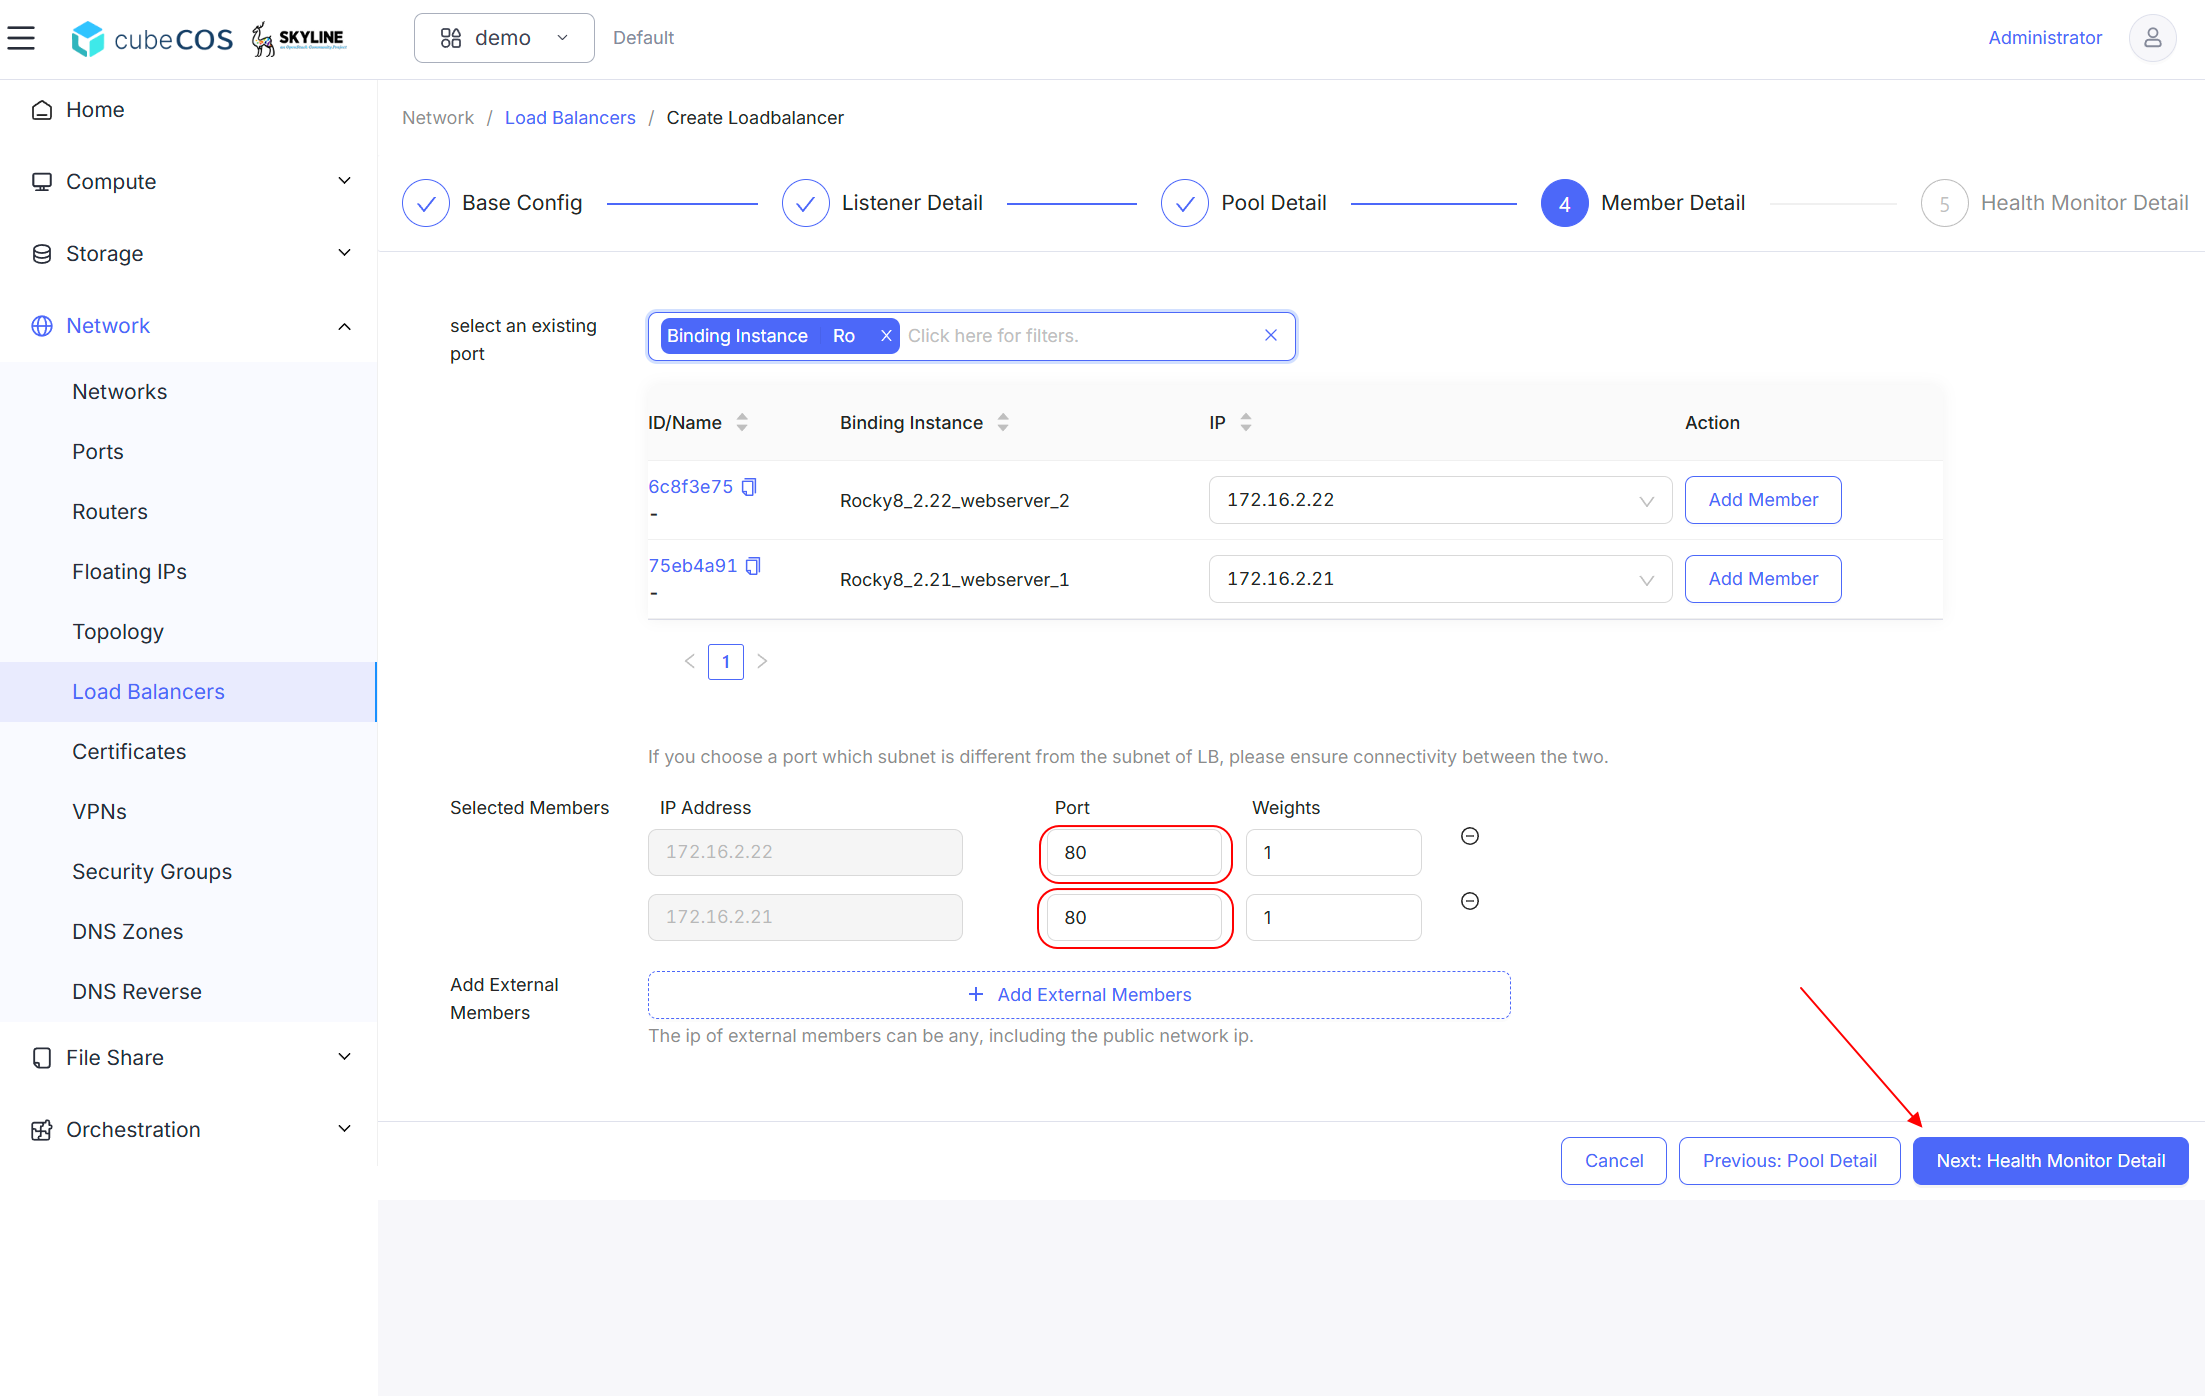
   Assign specific port of the instances selected.

   ![/assets/network/lb_create_8.png](/assets/network/lb_create_8.png)

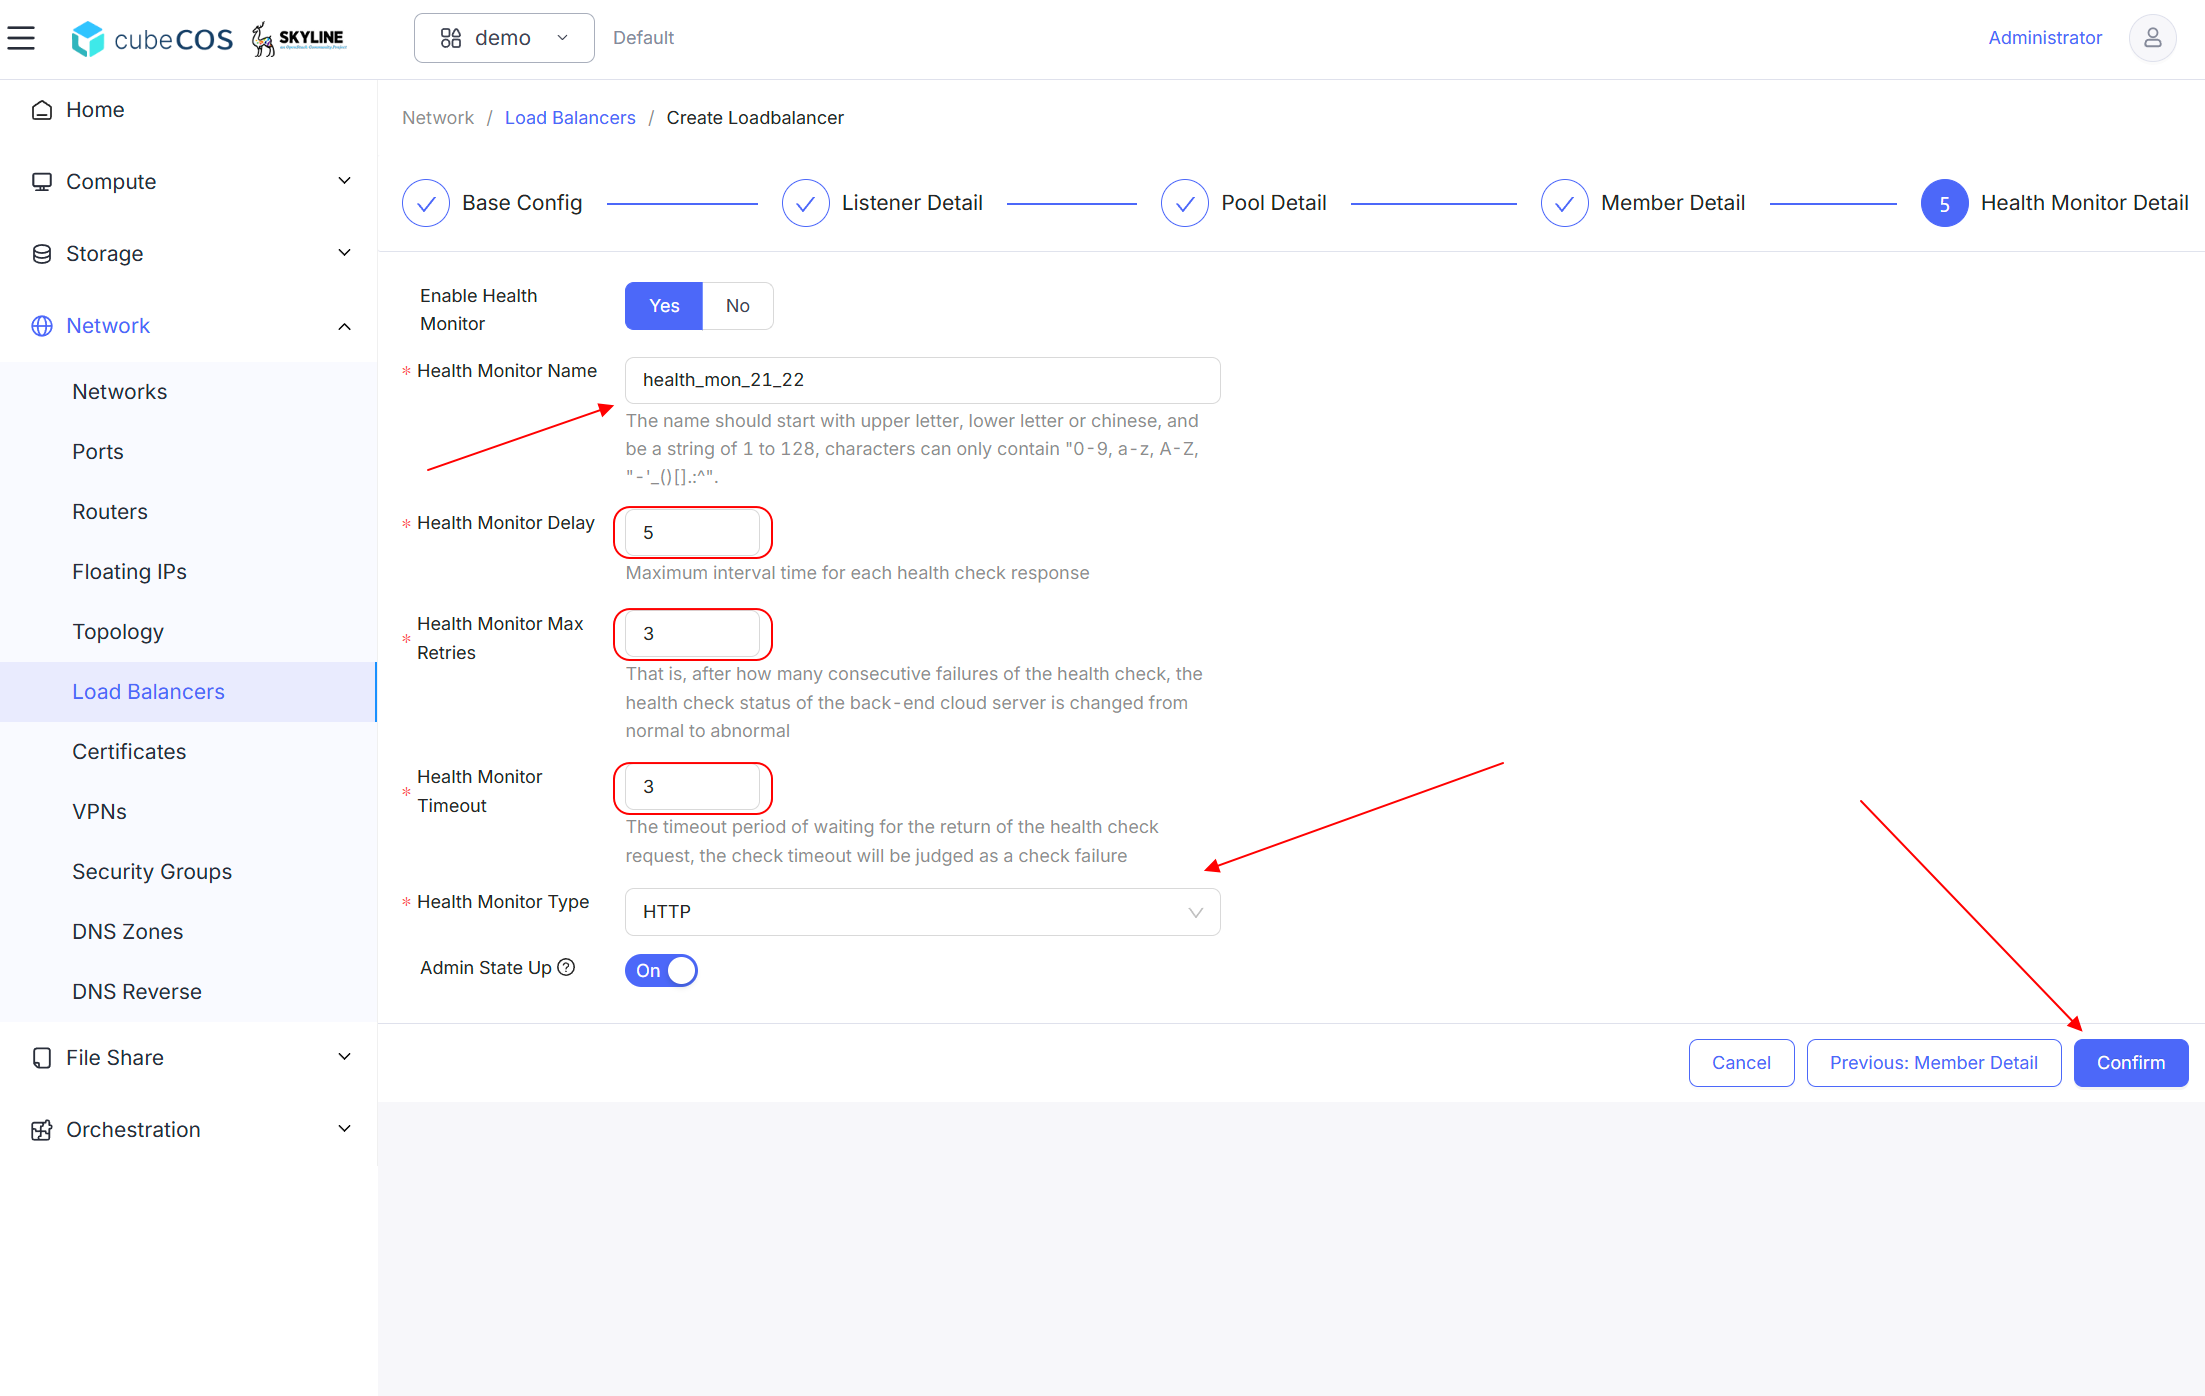
7. Health Monitor Detail
   - **Enable Health Monitor** : Switch to enable / disable health monitor(Default YES).

   - **\*Health Monitor Name** : Input the desired health monitor name.

   - **\*Health Monitor Delay** : Maximum interval time for each health check response(Default 5).

   - **\*Health Monitor Max Retries** : Counts of consecutive failures of the health check will switch status of the back-end cloud server from normal to abnormal(Default 3).

   - **\*Health Monitor Timeout** : Timeout period of waiting for the return of the health check request, the check timeout will be judged as a check failure(Default 3).

   - **\*Health Monitor Type** : Select the desired protocol for the health monitor. Based on `Listener Protocol` selection set up before.

   - **Admin State Up** : Defines the admin state of the health monitor(Defaul On).

   ![/assets/network/lb_create_9.png](/assets/network/lb_create_9.png)

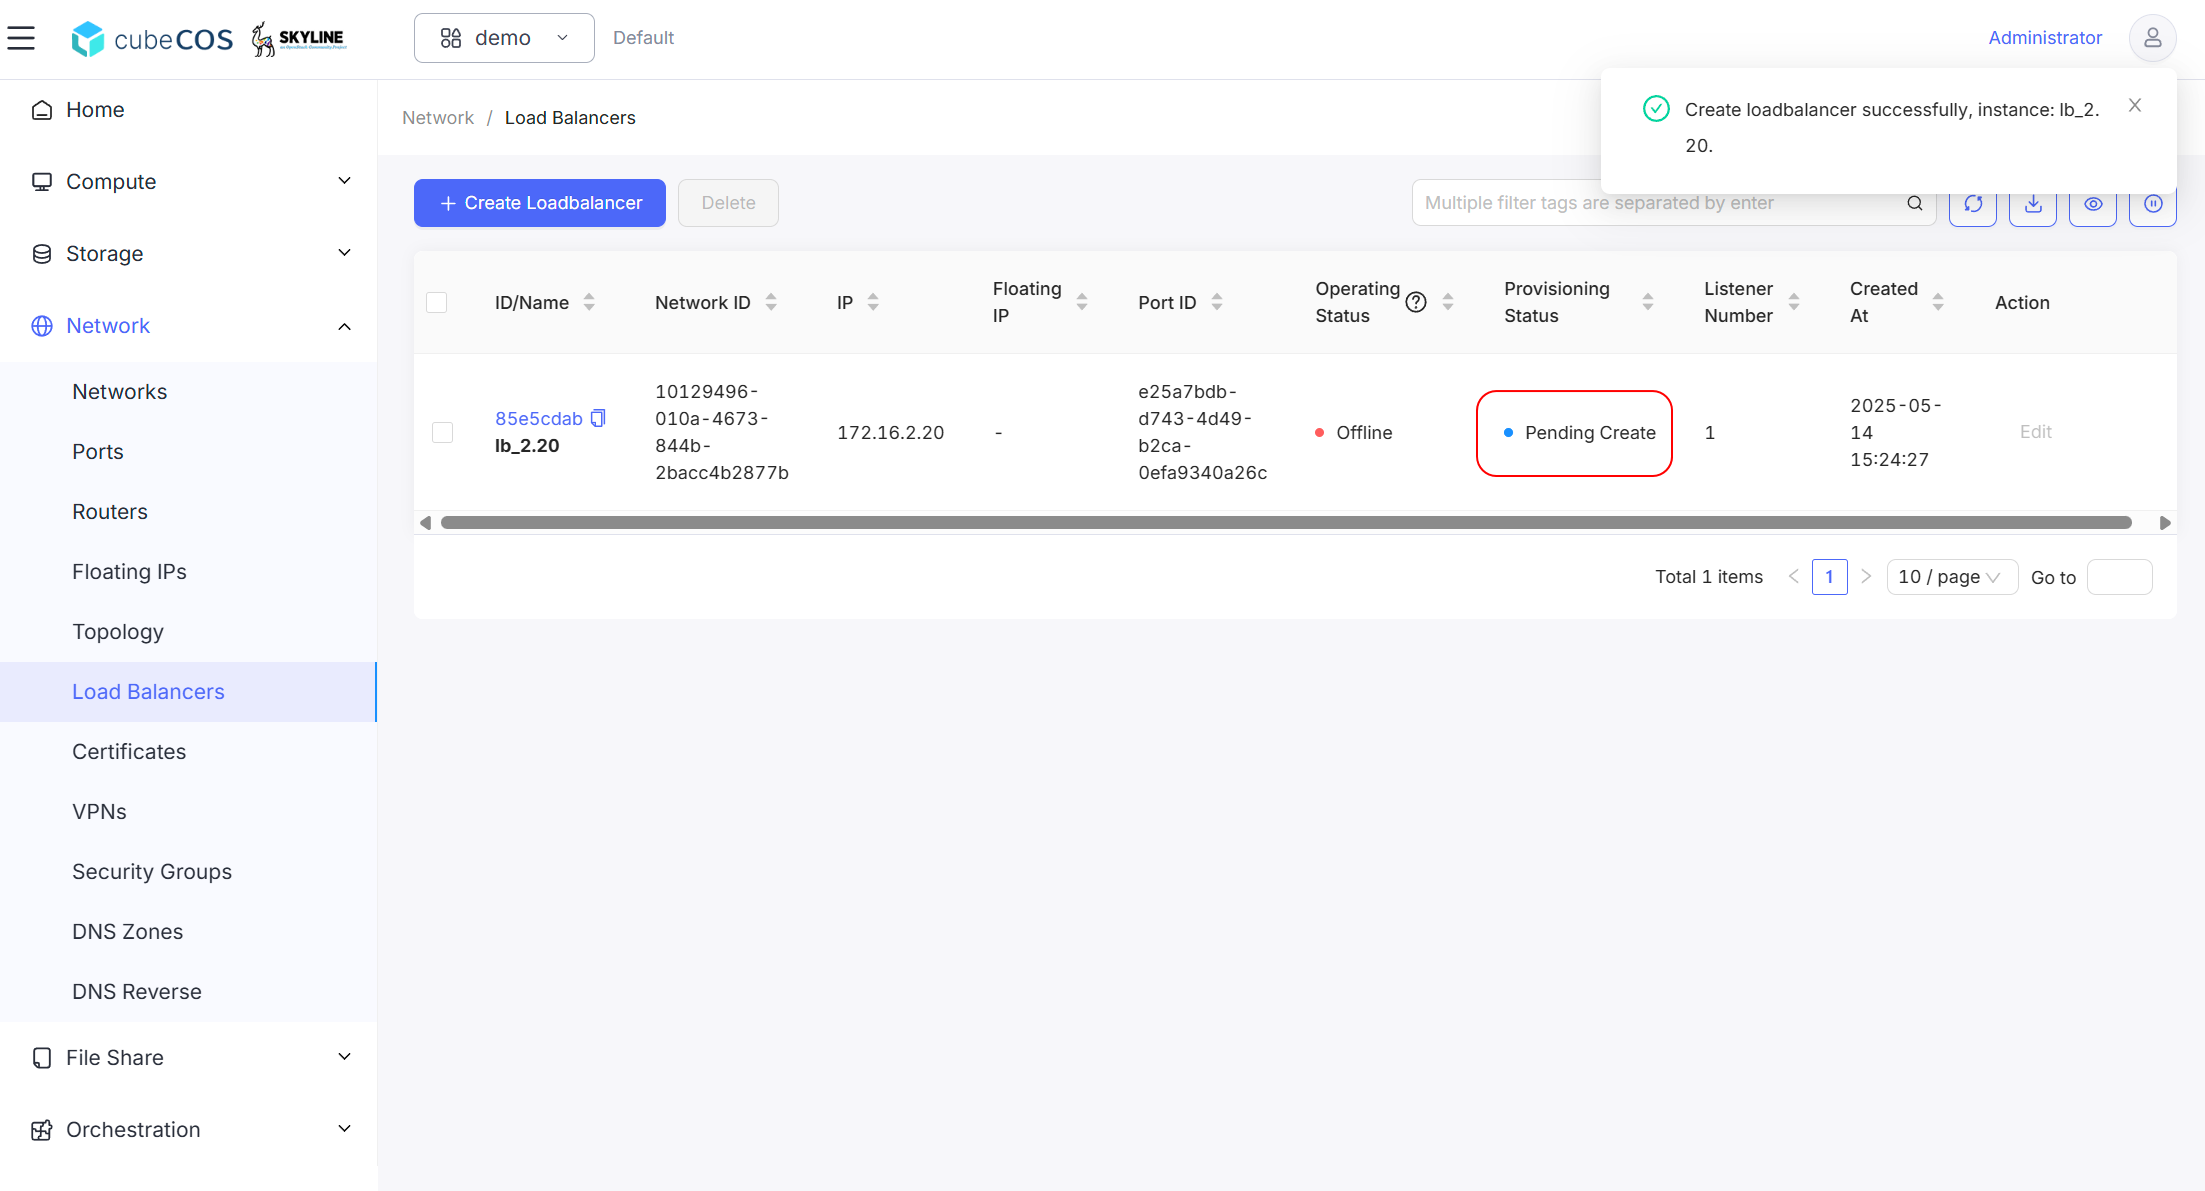
8. Launch the load balancer, verify the status of the load balancer will be `Pending Create`

   ![/assets/network/lb_create_10.png](/assets/network/lb_create_10.png)

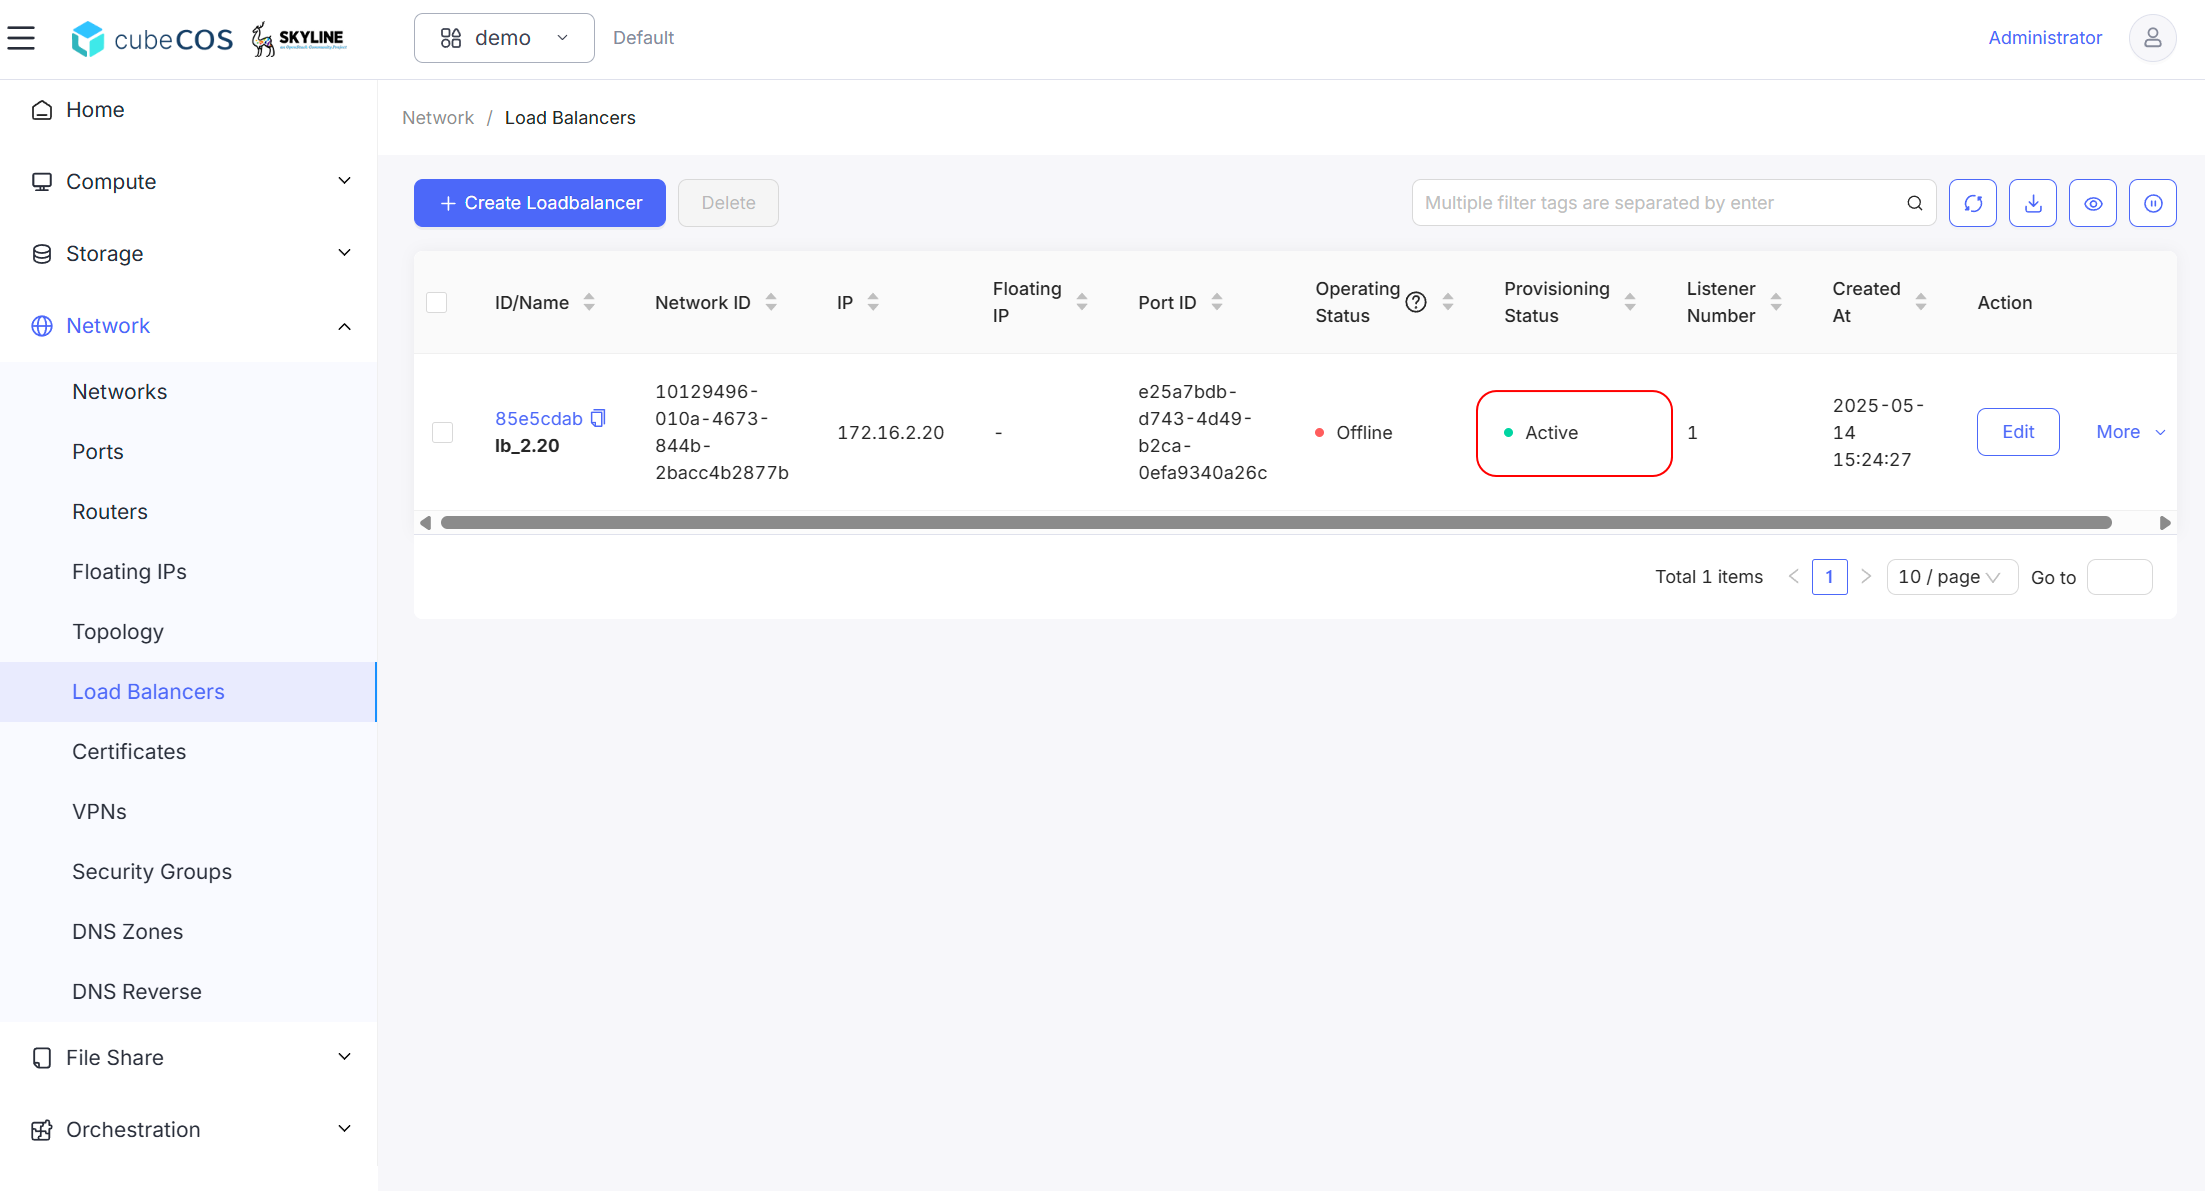
9. Wait till the load balancer status become `Activate`

   ![/assets/network/lb_create_11.png](/assets/network/lb_create_11.png)

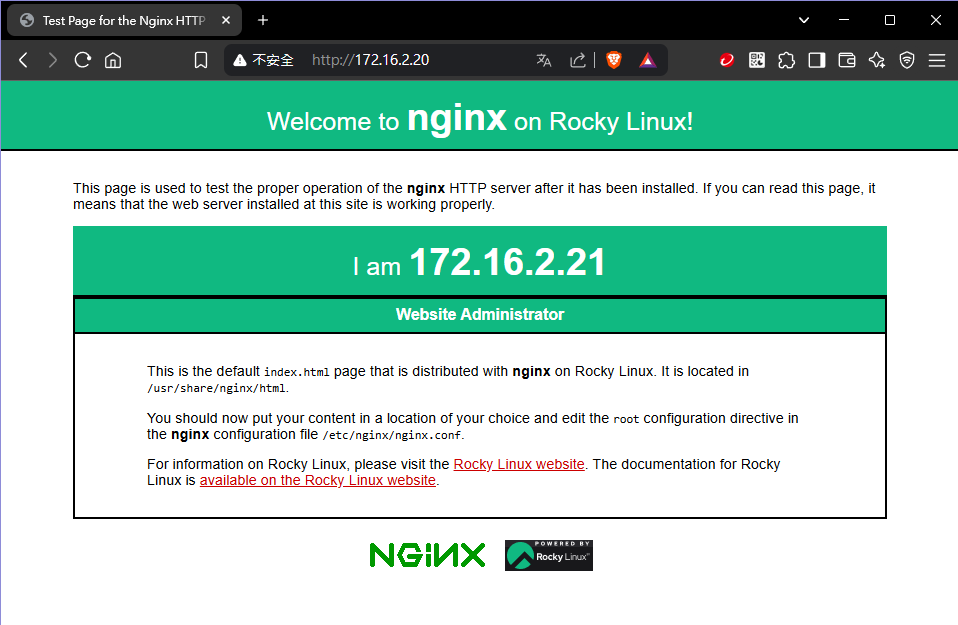
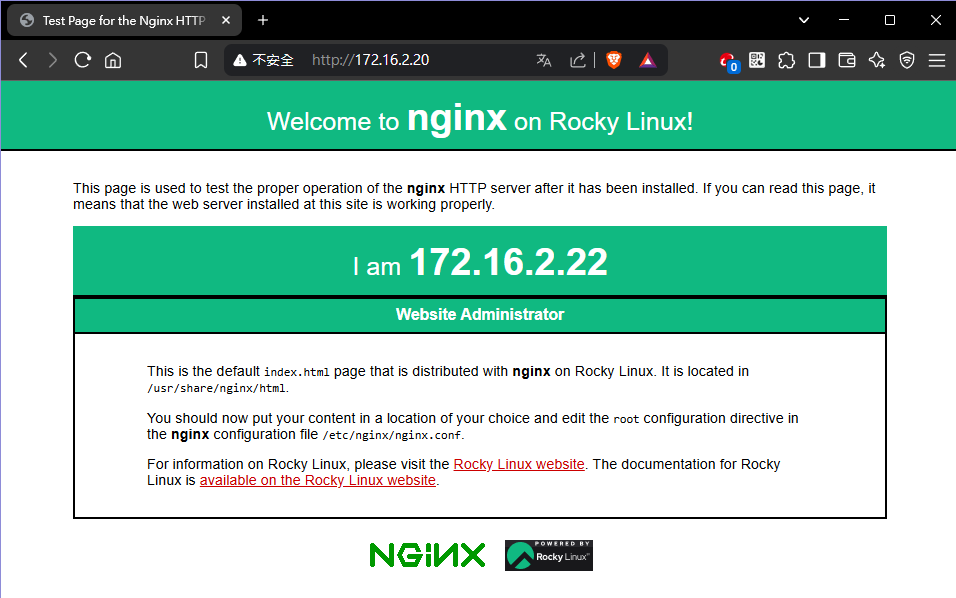
10. Verify load balancer reliability by accessing the website. Terminate or add load to an instance in the pool to test.

    ![/assets/network/lb_create_12.png](/assets/network/lb_create_12.png)  
    ![/assets/network/lb_create_13.png](/assets/network/lb_create_13.png)